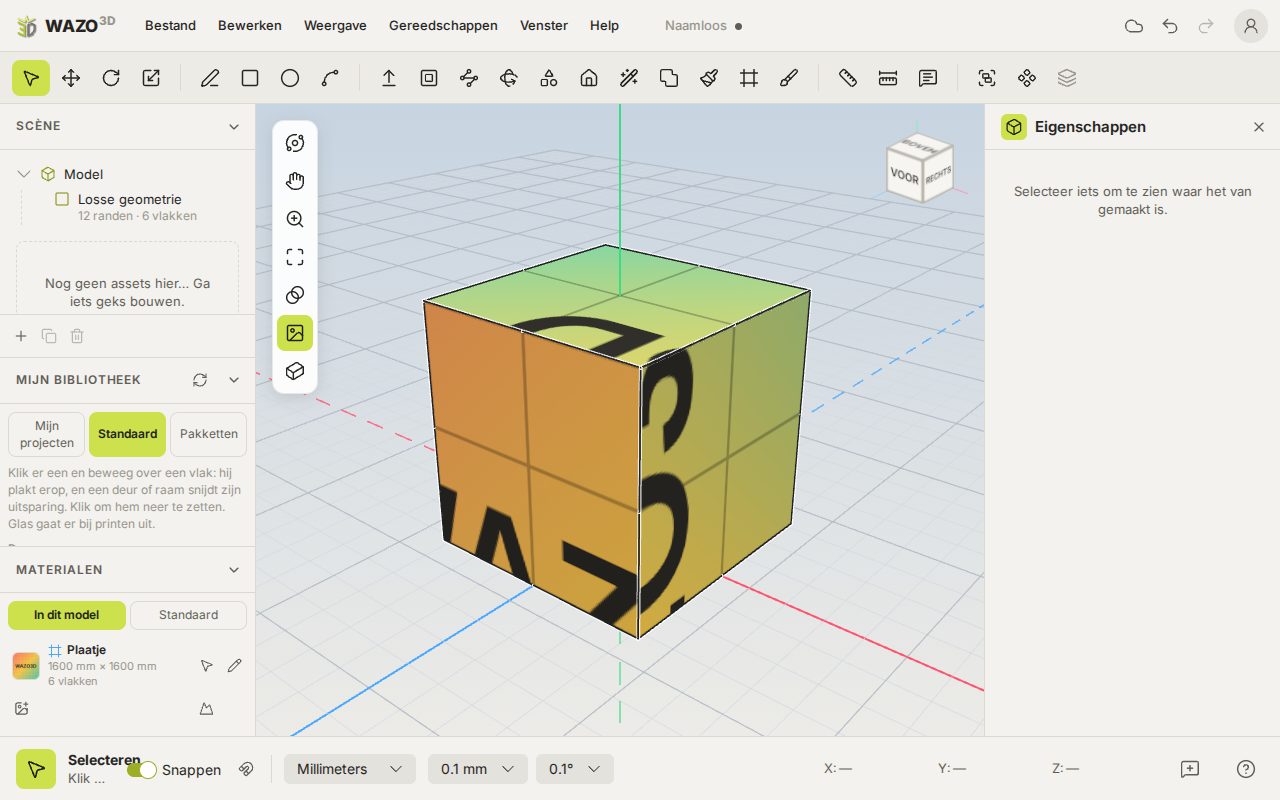
How to use WAZO3D, chapter by chapter. Looking for something? Type it at the top: only the parts that contain it stay, from every chapter. Names of buttons and menus are in bold, keys look like key.
Nothing found. Try another word — the name of a tool, for example.
Chapter 1
The editor: what you see and what it is for
WAZO3D is a 3D modeller in your browser, for people with an idea: makers, model builders, 3D printers, designers. You draw the SketchUp way: lines become faces, and faces are pulled up into shapes. This chapter shows where everything is and how to look around.
What is WAZO3D for?
With WAZO3D you turn an idea into a 3D model: a little house for a model railway, a part to print, a furniture design, a figure for a game. What you make can then go further:
3D printing: with a check for your own printer and scale (chapter 11).
Building by hand: construction drawings, cut-and-fold sheets, print sheets and laser cut files (chapter 11).
To other programs: glTF, OBJ, FBX and STL, for Blender, Unity, games and the web (chapter 12).
Showing and sharing: in the showcase on the site, or with other apps such as TRAX3D (chapter 12).
Everything works in millimetres at real size; you only choose a scale when you make something. So you draw an H0 house at the size of the real house.
The screen
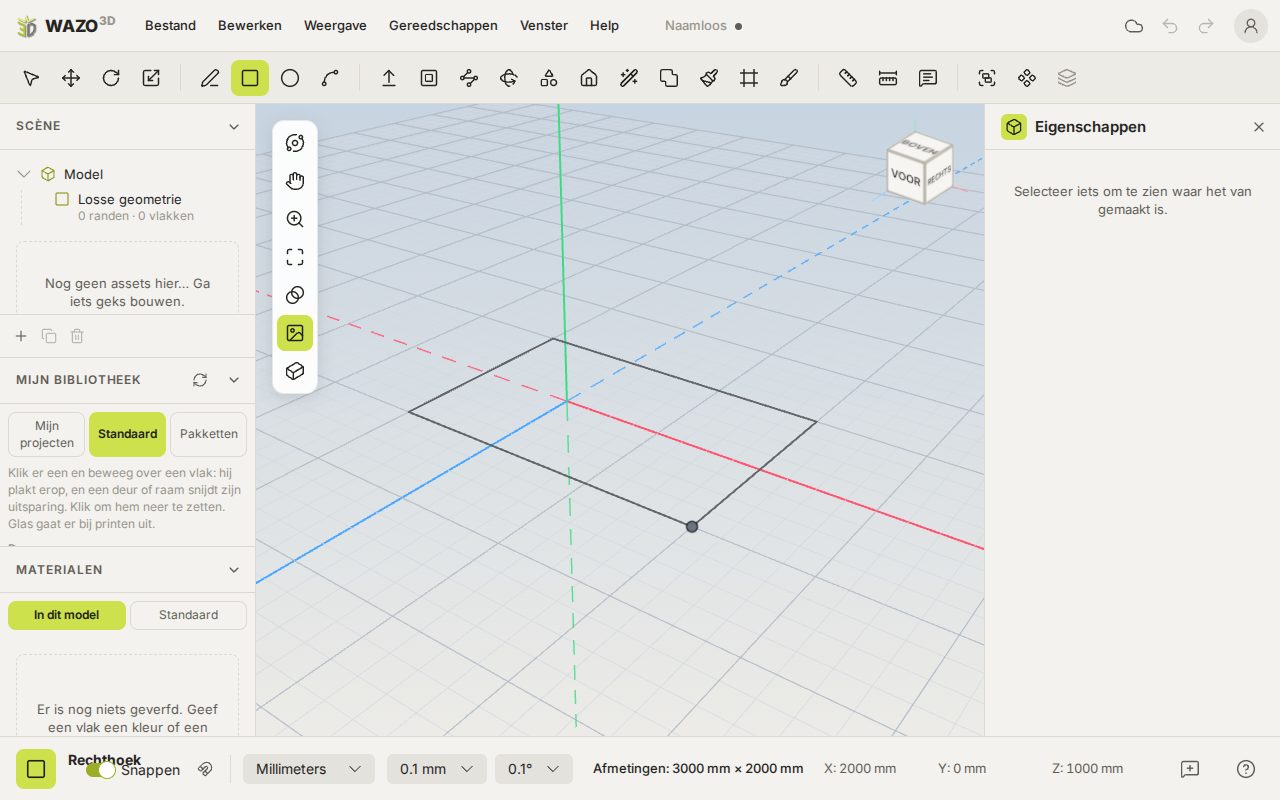
The WAZO3D screen: menu bar, ribbon, panels left and right, the view and the status bar
Menu bar at the top: File, Edit, View, Tools, Window and Help. On the right the cloud (what is saved), undo / redo and your account.
Ribbon below it: every tool as an icon. Move over one and you see its name and its shortcut.
Every button is an icon, everywhere — in the ribbon, in the panels and in the toolboxes. Hold the mouse over it and you read what it does, with its shortcut when it has one. Only dialogs have words, because there you answer a question.
On the left the Scene panel (everything in your model, as a tree), My library and Materials. Each panel folds up; you switch them on and off under Window.
On the right the Properties panel: everything about what you have selected — sizes, colour, picture.
At the bottom the status bar: which tool you are holding and a short explanation, Snap (lining up on or off), the Units and the Precision, the coordinates under the cursor, and the measurement box where the sizes you type appear.
In the view itself: a floating navigation bar (orbit, pan, zoom, zoom extents, views) and the cube at the top right. Click a face of the cube to look straight from the front, from above, and so on.
The theme (light, dark, as your system) and the language are set under View. The axes: red is X, green is Y and points up, blue is Z.
Looking around: orbit, pan, zoom
What
How
Orbit round the model
Drag with the middle mouse button. You orbit round the point under the cursor.
Pan
Hold Space or H and drag with the left button; or drag with Shift + the middle button; or the hand in the navigation bar.
Zoom
The scroll wheel — you zoom toward the cursor. On a trackpad: pinch.
Zoom extents
Shift+Z, or View › Zoom extents.
Straight from the front, from above…
Click the cube, or View › Standard views.
See-through model
X, the button with the two circles in the navigation bar, or View › See-through model.
Smooth shading
View › Smooth shading: round shapes made of flat facets look smooth. Faces meeting at more than 60° stay a corner, so a box stays a box.
Show lines
View › Show lines off: no more black lines, handy for a picture of a painted model. You can still click the lines.
The outline of round shapes
A sphere, cylinder or other round shape gets a line along its outline by itself, seen from where you look; orbit round the shape and the line goes with you. With Show lines off it goes too.
Textures on or off
The button with the picture in the navigation bar, or View › Show textures. Off draws every face that wears a picture flat in that picture's average colour; the model itself keeps its pictures, in an export too.
See-through model. Every face becomes glass; the lines stay black. Handy over a reference photo: you see the photo right through what you have drawn already. It has nothing to do with how see-through the photo itself is. Hold the mouse on the button and its tooltip says how it stands: See-through model (X) · on or · off.
Tip. A tap on the Space bar (let go without dragging) chooses Select. Only when you drag while holding it do you pan the view. That works with any tool in hand.
Zooming in stops in front of a face: you no longer shoot through the model, and orbiting and panning slide along a face instead of through it.
A free account
The editor is for members. Whoever opens it without being logged in sees the editor in the background and, in front of it, a card to log in, with Make an account beside it. If you type an address we do not know yet when logging in, the card switches to a new account with your address and password already filled in; only your name is left. After signing up you are in at once; you do not have to wait for a mail. We do send a link to confirm your e-mail address. Until you have done that, a bar at the top of the editor offers Send it again. Confirm your address within two weeks: we remind you a few more times, and after that we delete an unconfirmed account with its models.
Tick Yes, I become a tester when you sign up and you get the testers' newsletter and can earn a lifelong discount. You can also become a tester later, on the Early Access page or your account page.
The tour: your first birdhouse
As long as you have not finished the tour, you get an invitation in the middle after logging in or signing up: Your first model: a birdhouse. Start the tour begins with an empty model; if your model is not saved yet, the editor asks about that first. Then a card at the top left shows one step at a time. The step's tool lights up orange in the ribbon, and orange arrows with a text box point at what in the editor helps you, such as the measurement box or the label saying what your cursor snaps to. The tour goes on by itself as soon as your model shows the step worked, even when you did it your own way.
Rectangle (R): click a corner and type 300;240, Enter: the floor.
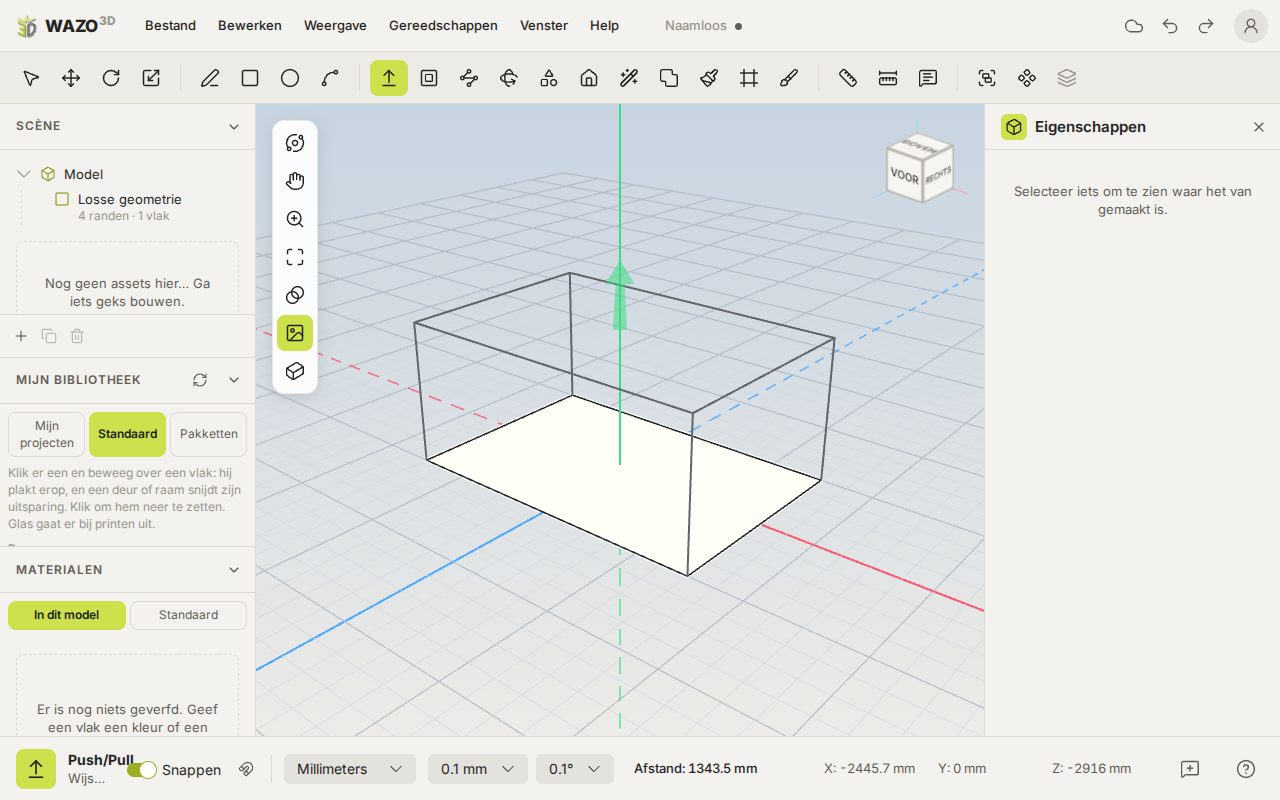
Push/Pull (P): pull the rectangle up and type 200: the walls.
Line (L): a line over the top, from middle to middle. The editor snaps to the middle; beside the cursor it then says Midpoint. Stop the line with Esc, or it carries on.
Move (M): move that line straight up. As long as you stay On green axis, the line is green: you are moving straight up.
Circle (C): two circles on the pointed wall, radius 30 for the entrance and 6 for the perch.
Push/Pull: push the large circle 40 into the house: the entrance.
Push/Pull: pull the small circle 40 out: the perch.
Line: a line across the pointed wall, from corner to corner where the roof begins, and Esc.
Push/Pull: push the triangle above it 20 out: the roof reaches out over the entrance.
Paint: choose Walls: brown or Roof: red on the card and click the walls and the roof.
Stuck? After a while a tip appears, and Show me does the step for you. At the end you keep your birdhouse with Keep my birdhouse. The cross stops the tour for now; next time you get it again, and you also find it under Help › Tour: make a birdhouse.
Chapter 2
The basics: drawing, pulling up, moving
A handful of tools makes nearly everything: you draw a shape on the ground or on a face, pull it up into a block, and move whatever you like — a whole shape, but also a single line or a single point.
Selecting
Space chooses the Select tool. Click a point, edge, face or group.
Shift+click adds or takes away.
Double click on a face: the face with its edges. On an edge: the edge with its faces. On a group: you open the group to work inside it.
Triple click: everything joined to it — a whole box.
Drag a box: from left to right (a solid line) takes only what lies wholly inside it; from right to left (a dashed line) takes everything it touches.
Esc first stops what the tool is doing, then lets go of the selection, then closes an open group, and when there is nothing left to let go of you go back to the select tool, so that you can point and select again.
Click Loose geometry in the Scene panel to select everything at once.
Drawing: line, rectangle, circle, arc
Drawing a rectangle: the label beside the cursor says what it lines up with
Tool
Key
How
Line
L
Click, click, click… Every click is an edge. Click the start point to close; Esc stops. A closed shape in one plane becomes a face by itself.
Rectangle
R
Click two corners, or one corner and then type the size (2000;1500). Type the size right after the second click and the rectangle you just drew gets that size. On a face it draws on that face. When the first corner snaps to a corner point or an edge, the way you drag decides the plane: over a wall on the wall, over the top on the top, over the ground flat. Circle and arc do the same.
Circle
C
Click the centre, then click or type the radius. A circle stays a real circle: you can change its number of segments in the properties later.
Arc
A
Start, end, and then how far it bulges.
Lining up (snap)
As you move, WAZO3D looks for something to hold on to: an endpoint, a midpoint, on an edge, on a face, or along an axis (the line then turns red, green or blue). It takes a point when you come near it; a line too when you are just beside it, even in the air beside the edge of a building. Beside the cursor it says what it found. To draw freely, switch Snap off in the status bar.
Choosing what it snaps to. With the little magnet beside Snap you tick what may be snapped to: points (ends, guide points, crossings), middles and centres, lines and guide lines, and the axes from your last point. The surface under the cursor is always there.
While drawing you steer it with keys, as in SketchUp:
Hold Shift: holds on to what it snaps to now. On an axis or an edge you stay on that line, on a face in that plane, on a point in the direction of that point, however far you move the mouse away. Letting go frees it again.
Hold Alt: only the surface under the cursor, nothing snapped on it. Handy for a free shape on a sphere or among many lines.
The arrow keys: fix a direction from your last point: → the red axis, ↑ the green (up), ← the blue, ↓ along the normal of the face you started on (straight out of a sloping roof). Pressing it again, Esc or another tool lets go. Click a point elsewhere meanwhile and it takes that point's distance along the direction.
What is held shows in the status bar beside Snap.
A line across a face divides the face in two. A shape inside a face becomes a hole in that face.
Typing sizes (the measurement box)
While you draw, pull or move you can simply type a number and press Enter — you need not click anywhere. The number appears in the measurement box at the bottom right.
Without a unit, the unit at the bottom of the status bar counts. With a unit works too: 2.5m, 80cm, 12in.
A typed number is not rounded to the precision: type 1234.56 and it is 1234.56.
Backspace takes away a character, Esc empties the box.
A rectangle is typed as width and depth: 2000;1500 (or 2000x1500).
A circle or arc with a number of segments: 32s.
Right after a push/pull a typed distance changes the pull you just made, instead of making a new one.
Making shapes: push/pull, offset, Follow Me
Push/Pull: pulling a face up into a block
Push/Pull P
Point at a face, press and drag (or click, move, click). A flat face becomes a box; the top of a box simply moves further up. The cursor is then an arrow showing which way you pull. Type a distance for an exact height. Move past another point or an edge and the height lines up with it. Lining up: during the pull, move over a point, an edge or a face, and the pull stops at that height. Over a face lying the same way (the top of another box) it comes exactly into that face's plane.
Offset F
Point at a face and move inward or outward: the edges move along, parallel. That is how you make a frame or a rim. Type a distance for an exact size.
Follow Me
First select the path: the edges the shape must run along (with Shift+click).
Choose Follow Me in the ribbon.
Click the profile: the face to be carried along the path.
Corners are mitred neatly. The path must be one unbroken chain.
Moving, copying, rotating, scaling
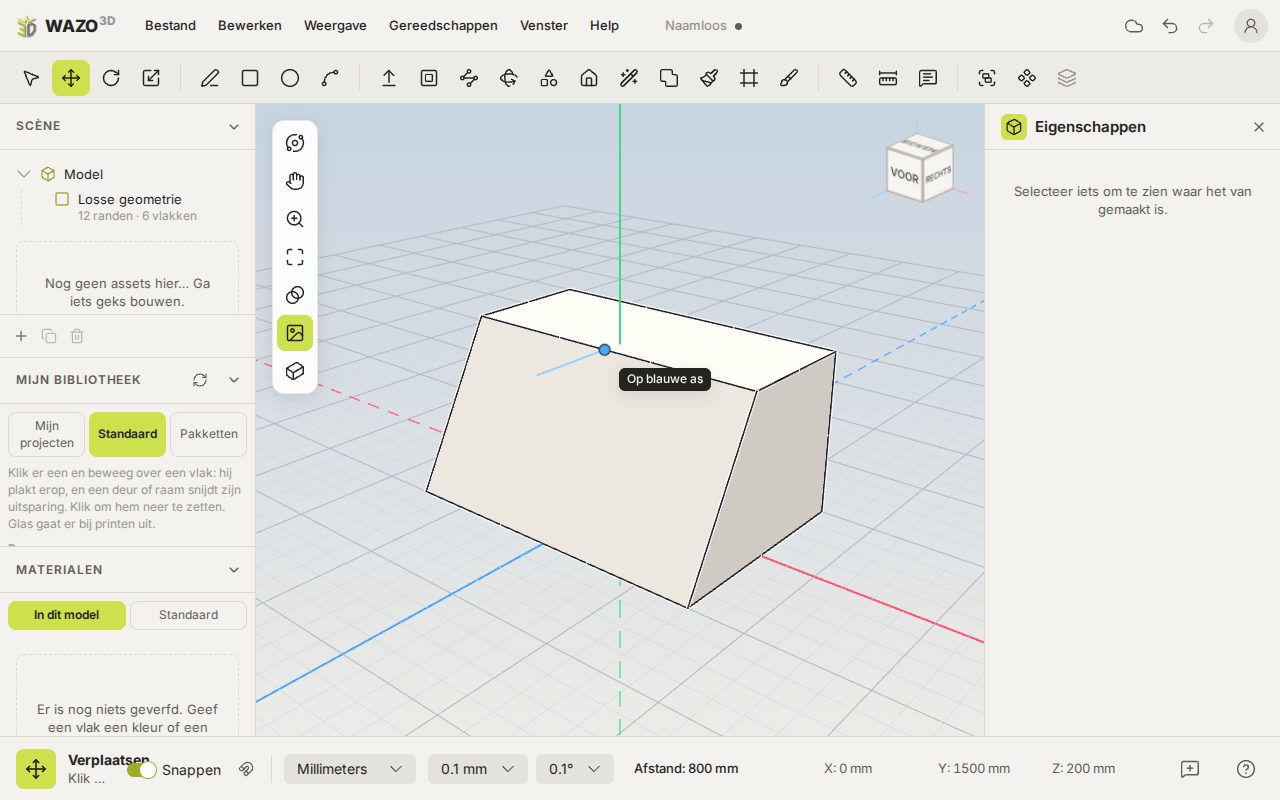
Moving an edge: the faces round it stretch along
MoveM: pick up the selection (or what lies under the cursor: a point, edge, face or group) and put it down. The gizmo's coloured arrows move along one axis. Type a distance for an exact move.
Copy: a tap on Ctrl while moving switches it to copying (a little plus appears). Or Ctrl+D duplicates the selection beside it.
RotateQ and ScaleS: with the gizmo on the selection. At the bottom you see the angle or the factor.
Cut, copy, paste: Ctrl+X / C / V. What you paste hangs on the cursor; click to put it down.
Putting a point exactly: select the point and type X, Y and Z in the properties.
Move a point so that a face is no longer flat and WAZO3D folds the face into triangles, as SketchUp does too.
Pointing and clicking: in Move, Push/Pull, Rotate and Scale, what you would select lights up as the cursor goes over it, and a click selects it (with Shift to add or take away). So there is no need to go back to Select first. Dragging moves; a click on what is already selected picks it up, and a second click puts it down. Over a face it can pull, Push/Pull simply pulls.
Moving lines and points
With MoveM and nothing selected you drag what lies under the cursor. Point at a corner and you move only that point; point at an edge and you move that edge. The faces joined to it stretch along, so a box becomes a sloping roof or a wedge. When a face is no longer flat because of it, WAZO3D folds it into triangles.
Chapter 3
Advanced: groups, units, measuring
Keep a larger model tidy with groups and components, work exactly with units and precision, and measure and dimension as you build.
Groups and components
An open group: what stands round it fades, and the badge says what you are editing
Make a group: select and press G (or Edit › Make group). A group moves as one and does not stick to the rest.
Working inside it: double click the group. A badge in the view says what you are editing; Esc (with nothing selected) or the cross closes it.
Explode: Edit › Explode, or Explode in the properties.
Make a component: the button in the ribbon or Edit › Make component. Copies of a component share everything: what you draw in one appears in all. Make unique sets one copy apart from the rest.
The Scene panel shows every group and component as a tree; click to select, double click to open.
Group or component? A group is a separate piece that does not mix with the rest. A component does the same, but all its copies are the same thing: change one and they all change. Use components for what comes up more often — windows, posts, chairs.
Units and precision
At the bottom of the status bar you choose the unit: millimetres, centimetres, metres, inches or feet. Everything you read and type is in that unit; the model itself stays in millimetres. A size in another unit is typed with its unit: 2.5m, 80cm.
At the bottom, beside the units, is Precision. There you choose the step you work in — in millimetres for example 1 mm or 0.1 mm, in metres down to 0.0001 m. That one number does two things:
It decides what you read. Every size in the program is shown to that step — the status bar, the properties panel, the dimensions.
It decides what you make. What you draw gets no finer size than that. Work in whole millimetres and a line is never 1234.56 long but 1235.
Snapping to a point comes first. Click an existing point — a corner, a midpoint, the centre of a circle, a crossing — and you get that point, exactly as it is. Otherwise you would lose a corner of your model as soon as it did not lie on the step.
A typed size also counts exactly as you type it: there you say the number yourself.
What it comes to per tool: a line gets a length on the step, a rectangle two sides on the step (not the diagonal), a circle a radius on the step, push/pull and offset a distance on the step, rotating an angle on the angle step and scaling a size on the step. A point that is joined to nothing — the first point of a line — lands on the grid of whole steps.
Scaling
With Scale (S) it is not the factor that is rounded but the size that comes out. A factor says little by itself: 1.25 sounds tidy but leaves your box at 1987.3 mm. So the drag looks for the factor at which your selection comes out on a whole step along that axis.
At the bottom you read both: Factor: 1.961 · 5778 mm. The number at the end is the one that is exact.
Angles
Beside the length step is the angle step: 45°, 30°, 15°, 10°, 5°, 2°, 1°, 0.5° or 0.1°. An angle is not a length — nobody works in tenths of a degree, people work in fifteens — so it has a list of its own instead of decimal places.
It counts for rotating with the gizmo (Q) and for the turn grip of a picture. Set it to 15° and a turn jumps from 15 to 30 to 45; what you read in the status bar is then exactly what happened. At 0.1° — where it starts — you notice nothing, except that the number in the status bar is now exact instead of rounded.
The precision is remembered per unit. Switch from millimetres to metres and each keeps its own setting; otherwise a tenth of a millimetre would suddenly become a tenth of a metre.
Measuring, guides, dimensions and text
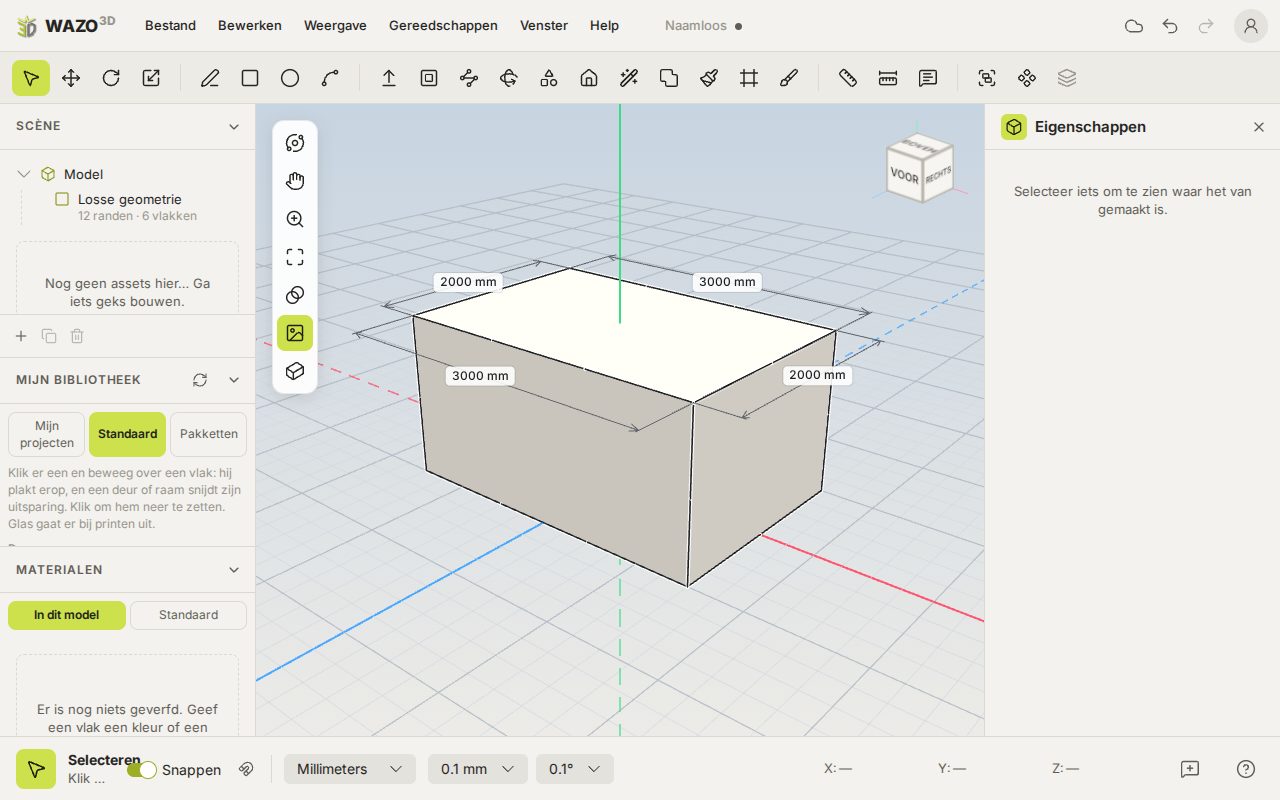
Dimensions that follow the model; double click a size to give the model that size
MeasureT: click two points, the length shows at the bottom. Start on an edge and you lay a guide line parallel to that edge; start on a point and you lay a guide point. A tap on Ctrl switches laying guides on or off. Type a distance for an exact place.
You can line up on guides and where they cross. Edit › Delete guides clears them away.
Dimension: click an edge (or two points) and pull it out. On a circle it gives the diameter, on an arc the radius. The size follows the model.
Dimensions all at once: first select lines or faces, then choose Dimension. Every selected line, and every edge of every selected face, gets a dimension at once, set outward. Circles get a diameter, arcs a radius. One Ctrl+Z takes them all away.
The length of a line: select a line and its length shows at the bottom and in the properties. With several lines you see how many there are and how long together.
Giving the model a size: double click a dimension's label, type a size and press Enter. The model takes that size — a box gets longer, a circle larger.
Text: click something and a note with an arrow appears; it starts with the area, length or radius. Type your own text in the properties or double click the label.
Repeat: in a row, in a grid, round a circle, along a line
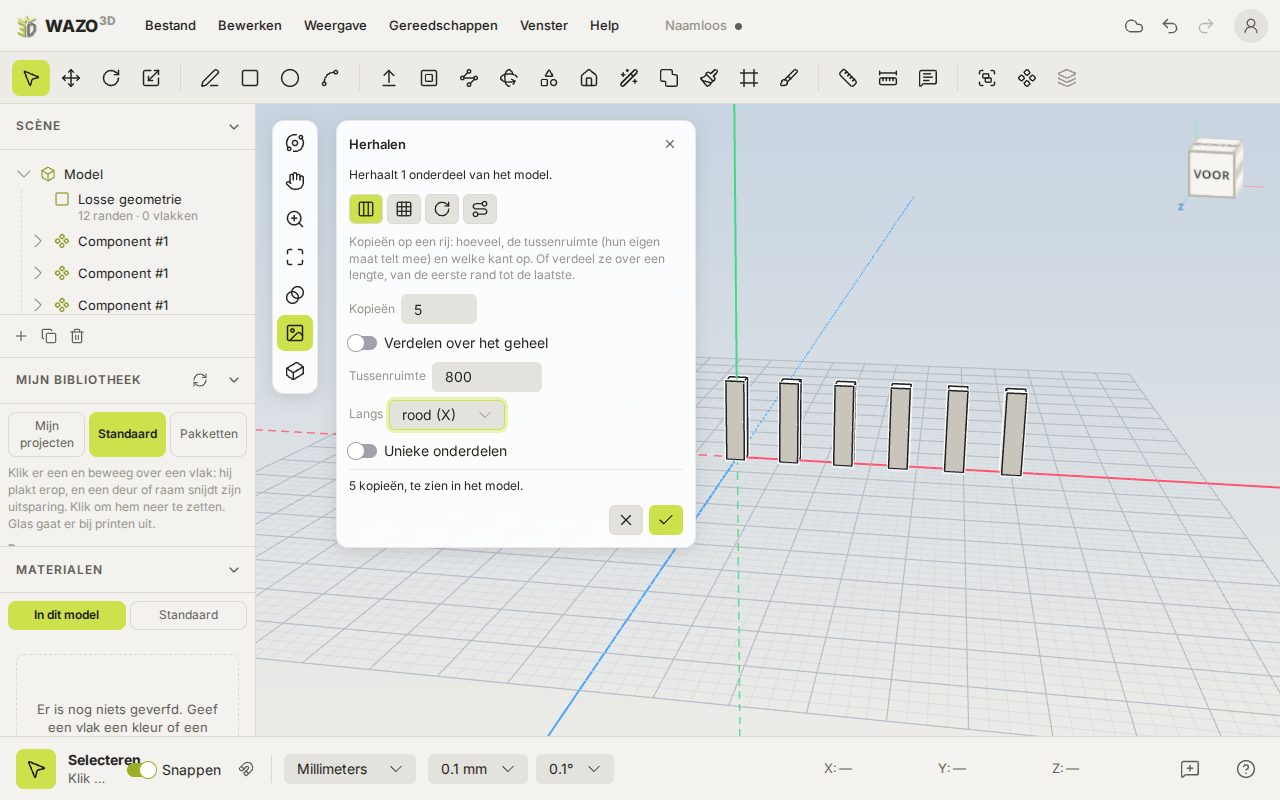
Repeat: the copies are already in view while you change the numbers
Select what you want to repeat and choose Edit › Repeat…. A panel appears beside the navigation bar. The copies stand in the model at once while you change the numbers; only the tick really makes them, as one step that Ctrl+Z takes back in one go. The cross, or closing the panel, puts everything back.
In a row: how many copies, the room between and along which axis (red, green or blue, either way). The room between really is the space between the parts: their own size counts, so 0 puts them against each other. Switch on Spread over the whole and you type the total length instead, from the first edge to the last.
In a grid: how many across and how many up in all (6 and 4 gives 24, the original counted), each with its own direction and room between.
Round a circle: how many copies, every how many degrees, and about which axis. Point at the centre with the crosshair button and click in the model (otherwise it is the origin). Spread over 360° they stand evenly all the way round, the original counted. Turn with it off carries them round without turning them.
Along a line: click the pencil and click the points of the line in the model, starting where the selection stands. Enter or another click on the last point finishes, Backspace takes a point back, Esc gives up. You follow an existing line by clicking its corners; snapping to points helps. Turn with it turns each copy with the bends.
It works on anything you select: faces, lines, groups and components.
By default they become components: what you repeat becomes one component, and all the copies share it. Change one later and they all change. Switch on Unique items for separate copies that can each be changed on their own.
The panel remembers its settings. Select something else while it is open and it repeats that from then on.
Sticking to faces and cutouts
A component can do two things that belong together. You switch them on in the component's properties, under On faces; they count for every copy.
Sticks to faces: pick it up with MoveM and move over a face. It puts its back (z = 0 in its own axes) on the face under the cursor, turns its front outward and stays upright. On the face it already stands on it slides along; move over another face, round a corner or on a sloping roof too, and it goes there. A tap on Ctrl puts a copy down that way. Handy for a sign, a lamp, a handle.
Makes a cutout: it cuts its outline out of what it stands on, with reveals. Right through for a window or door in a wall (up to 1 m thick), or to a depth you type: a niche, a grip in a cupboard door. When the block is thicker than 1 m, a house drawn as one solid block for instance, it cuts only as deep as the part itself sits in the façade, so no tunnel runs through the whole house. Switching a cutout on switches sticking on with it.
The shape: draw the outline in the component's back plane (an arch for an arched window). Without an outline the rectangle the component takes up is cut out.
It has to be closed: what it cuts into must be a closed shape; a block drawn with push/pull is that by itself. When it is open (a loose face, a missing back), the panel says nothing is cut; close it with Tools › Repair › Make watertight.
The original stays whole: the cutout is made when drawing, exporting and sharing, not in the wall itself. Move the component and the hole goes with it; switch it off and the wall is closed again.
A cutout cuts the loose geometry it stands in, and groups beside it at the same level (a wall that is a group).
On curved faces — a round tower, a sphere, a dome — it goes just the same: the part sticks square to the round surface and slides smoothly over it, and the cutout reaches into the corners, also where the surface curves away backward. The round face then stays one smooth surface, with the hole in it.
Cutouts belong to Power (during Early Access everybody can use them).
WAZO3D's ready-made windows and doors already do all of this: see chapter 8.
Clicking on a grid
Tiles of a modular system — floors and walls of a dungeon, pieces of a marble run — must fit against each other exactly. For that, switch on Clicks on a grid in the component's properties, under Grid; it counts for every copy. A plugin that makes tiles sets it already.
System: tiles with the same system name click together, for example OpenForge. Tiles of another system take no notice of each other.
Cells: Squares or Hexagons, and how big one cell is (for hexagons: the width across the flats). Start without a plugin and it says 25.4 mm: the inch of most tabletop games.
Level height: how high one storey is. Left empty, every tile stays at the height of its neighbour; filled in, you can put a tile one or more levels higher or lower.
MoveM, copying with a tap on Ctrl, pasting and placing: the tile jumps to the nearest cell beside the nearest tile of the same system. When there is none yet, it clicks on the ground's grid. With RotateQ it turns a quarter at a time (hexagons: a sixth).
A corner of the cells (for hexagons: the middle of a cell) lies on the component's origin. Turn a whole room at an angle and new tiles simply click on at that angle: they follow their neighbour's grid.
Variants of your own: open a tile and change what you like inside — a crack, a torch holder, a little stair. The panel says Fits 2 × 2 cells. as long as the sides lie on the grid lines, and warns when a side lies off them: then it no longer fits against its neighbours. (For now that check is there for square cells only.)
Chapter 4
Colours and patterns
A face can get a colour, a pattern at its real size (bricks, planks), one picture folded round the whole model, or a sheet you paint on with a brush.
Giving faces a colour
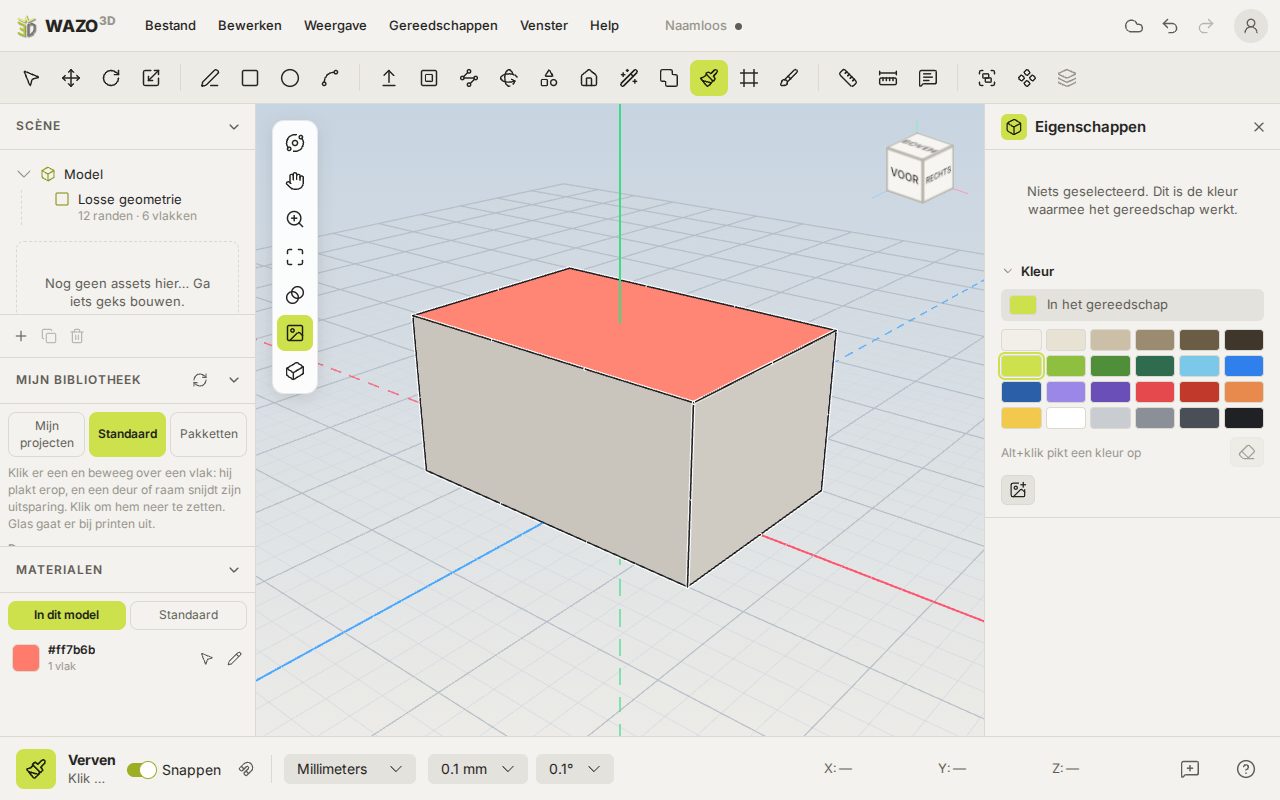
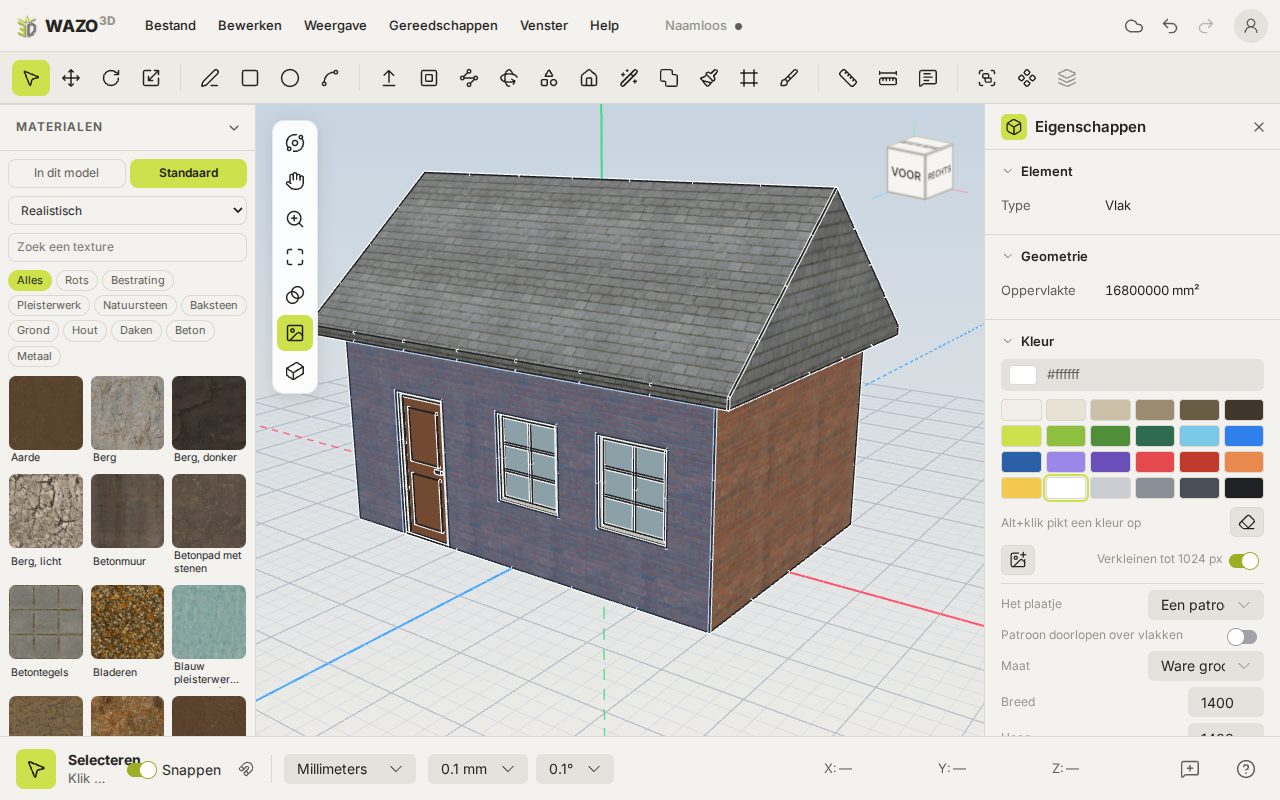
The paint bucket and the palette in the properties panel
PaintB: the cursor becomes a bucket with the colour in it. Click a face to paint it, or a group to paint the whole group. A curved face (a cylinder) is painted all over in one go.
Shift+click takes the colour off, Alt+click picks up the colour under the cursor.
In the properties, under Colour, there is a palette: choose a colour to paint the selection. With the bucket or the brush in hand the palette is there even when nothing is selected — then it is the tool's colour.
The square and the circle. The square under Colour shows the colour of what is selected; with nothing selected, the colour you paint with (The colour you paint with). Clicking a colour in the palette puts it in the bucket or the brush, and the square follows. The circle on the right opens the colour picker.
Any colour, and palettes of your own. The round button to the right of the colour swatch opens a colour picker: hue, saturation and brightness, or type a hex code such as #336699. Under the palette you choose which palette you use.
See-through. The See-through slider under the palette makes a colour see-through, from 0% (solid) to 95%: for glass, water, or a part you want to see half. With something selected it becomes see-through in one step, in the colour or picture it already wears; with nothing selected it is the bucket's, and a colour from the palette stays as see-through. The glass of the standard windows and doors is see-through already. A picture with see-through parts (a PNG) is cut out there: a fence or leaves on one face. The exports carry it (glTF, OBJ, FBX); an STL and a print know no see-through.
Swatches made, changed and removed where they stand. The + at the end of the palette opens a colour picker, and the colour you choose becomes a new swatch. On a palette of your own, hovering over a swatch shows a pencil (Change this colour; a double click does the same) and a cross (Remove this colour); a right click offers both. The swatch keeps its place, faces already painted keep their colour, and none of this paints anything. The WAZO3D colours always stay as they are: a + there starts a palette My colours.
The palette menu (Palettes: keep, change, import and save them) adds the colour in hand to a palette or takes it out, makes, renames or deletes a palette, imports one from GIMP (.gpl), Adobe (.ase, .aco, .act), .pal, .hex, Paint.NET (.txt) or Krita (.kpl), and saves the palette in hand as a file: GIMP, Inkscape and Krita (.gpl), Adobe Swatch Exchange (.ase), Photoshop (.aco), Adobe Color Table (.act), Lospec (.hex), Paint.NET (.txt) or Paint Shop Pro (.pal).
Where they are kept. Signed in, your palettes are kept in your account, so you have them wherever you sign in; the palettes you made in this browser before are offered to move into it once. Not signed in, they stay in this browser. The model remembers which palette it was painted from, with a copy of its colours: opening it chooses that palette again, and where you do not have it the model's copy is offered as … (from this model) — Keep this palette among my own in the menu keeps it.
Painting a component paints every copy.
The materials panel
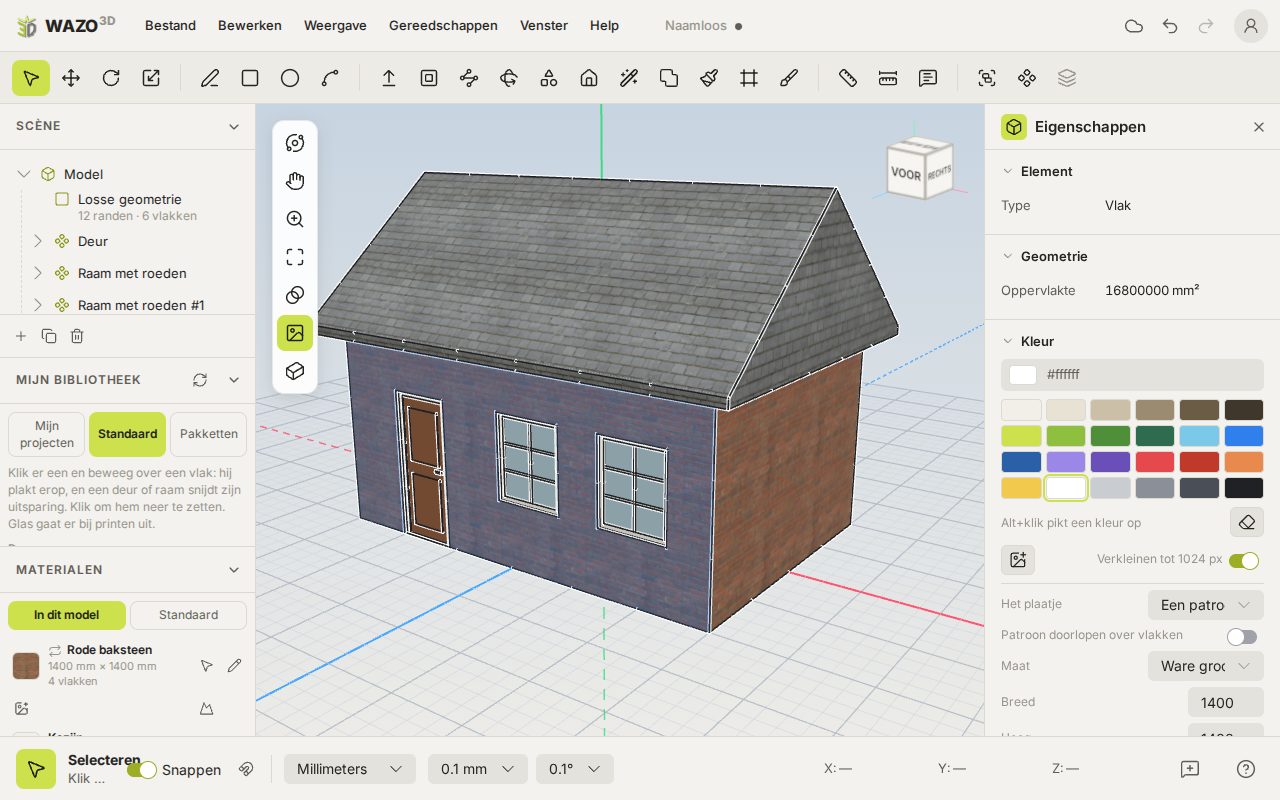
On the left, under Materials, are all the paints of your model. An icon in front of the name says what kind it is (a repeating pattern, a wrapped-up picture, a paint sheet). Click to fill the bucket with it; the arrow selects every face wearing that paint; the pencil gives it a name.
Filling faces with a texture
Standard textures: choose a series and a group, and click
Select a face (or a whole box with a triple click) and in the properties, under Colour, choose the button Choose a picture…. The first time, the picture is laid so that it fits the face exactly once; you set it from there. Shrink to 1024 px keeps your model light.
Under The picture you choose how it lies on the model:
Kind
What for
When you change the shape
A pattern, at its real size
Bricks, planks, roof tiles: something that repeats and has a real size.
The pattern keeps its size — a plank stays a plank, there are just more of them.
Wrapped up: one picture over the faces
One picture folded round the shape; every face gets a piece of it.
Every face keeps its piece; it stretches along.
A sheet to paint on
A blank white sheet to paint on with the brush.
What is painted stays and stretches along.
Setting a pattern
Size: type the size as Real size (millimetres), as Share of the face (per cent) or as Times across the face. It is always the same size, written down differently. The size belongs to the paint: it changes on every face wearing that paint.
Turned: the turn, per face. So planks can stand upright on one wall and lie on another.
Carry the pattern across faces: the pattern runs on round the corner instead of starting again on every face. Select the face where it must start and switch it on.
On a round pillar (a circle pulled up) a pattern runs on round the circumference by itself, as if the pillar had been unrolled: no new start on every segment. There is one seam at the back of the pillar.
Standard textures
In the Materials panel, beside In this model, is the tab Standard: ready-made textures from WAZO3D, with a normal map for the relief and at their real size (a brick is as big as a brick). Choose the series at the top — now Realistic; Stylized and Retro are coming — and look by group (brick, wood, roofs, ground…) or with a word. A click puts the texture in the paint bucket; then click a face. After that it is also under In this model, and you can change its size and turn as with any picture. The textures come from Poly Haven and are CC0: you may use them anywhere, also in what you export. Choosing a picture of your own still works.
Normal maps: relief on a picture
A normal map is not a second picture to look at, but a direction per pixel. It lies exactly over your picture — the same size, the same turn — and makes brick look laid instead of printed.
In the properties panel, under the picture: Choose a normal map…. Below it is Relief: how strongly it shows (1 is normal).
It goes on the existing paint. So no second material is added: every face and every group wearing that paint gets it at once. You can therefore add it later, replace it or take it off again.
A normal map is kept without loss of quality (PNG, also when you let pictures be shrunk): JPEG bends the directions and then your wall starts to ripple.
It goes along in the export to glTF, OBJ and FBX. STL knows no materials.
Changing an existing texture
In the Materials panel every material with a picture has two extra buttons: Change the picture… and the normal map. With them you swap the picture of a material you already use, and everything wearing that material follows — you need not paint anything again. One Ctrl+Z puts it back.
Placing by hand
Choose Place it on the face… (or Place the picture in the ribbon) and point at a face. Guides appear on the face:
the blue curved arrow round the middle turns the picture;
the red guide makes it wider or narrower, the green one taller or lower — the guide is as long as the picture and stretches as you pull;
with a wrapped-up picture or a paint sheet, the little block in the middle slides the picture.
You can take hold of a guide anywhere along its shaft. With a wrapped-up picture, every face turns, scales and slides together, so the joins stay; after turning, it is laid inside the picture again.
Wrapping a texture round an object
Wrapped up: one picture round the whole shape, every face a piece of it
With wrapping up, one picture — a photo, a label, a design of your own — is folded once round your object, as if you wrapped it in a sheet of paper. Every face gets a piece of the picture, and where two faces meet the pieces run into each other.
Select the object (a triple click takes everything joined to it) and in the properties choose Choose a picture….
Set The picture to Wrapped up: one picture over the faces.
Choose Place it on the face… to turn, scale or slide the picture. With a wrapped-up picture every face goes along at once, so the joins stay right.
A box cannot be laid flat without seams: where the sheet has to open, the picture does not run on. Change the shape later and every face keeps its piece and stretches along.
Painting an object
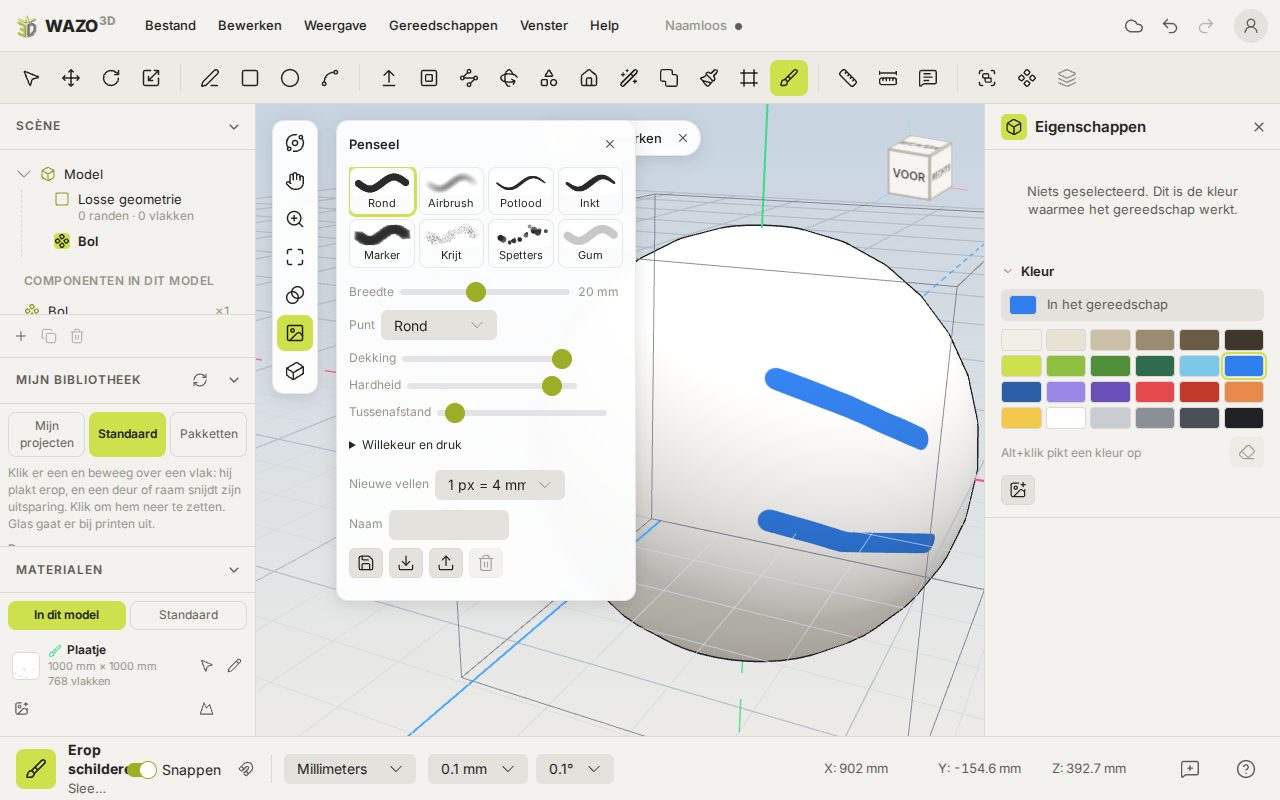
Painting on the model with the brush; the brush panel is on the left
Choose Paint on it (the brush) in the ribbon.
Choose a colour in the palette — with the brush in hand that paints nothing, it only fills the brush.
Type the brush's width, or set it in the properties panel under Brush. That width is a size on the model (20 mm, 2 cm): a stroke is as wide on every face and every object.
Drag over the model. The first time, WAZO3D wraps one blank white sheet round the whole model (the whole group, even when it is made of loose pieces). A stroke over an edge, or from one piece to the next, simply runs on.
You can simply paint a group: the brush goes into the group by itself.
Loose pieces and paint sheets. Select a group and the properties show under Geometry how many Loose pieces it holds (pieces that do not touch each other) and on how many Paint sheets they are painted. A model from before 4 October 2026 may have a sheet of its own for each piece; All on one paint sheet brings them together on one sheet, with everything you have painted already on it. The paint then runs a few pixels on at the edges of every piece, so no white seams show between the facets; that also happens after every brush stroke. Fuse the pieces into one solid melts the loose pieces into one closed shape, with their paint on it. That only works when every piece is closed: when it fails, everything stays as it was and WAZO3D says how many edges are still open (mend that with Tools › Repair).
With the brush in hand the brush panel appears (close it with the cross when it is in the way). At the top the kinds of brush — round, airbrush, pencil, ink, marker, chalk, spatter and eraser — each as a little stroke of itself. Below them what the brush does: the Width on the model (with the slider; typing works too, simply key in a size with the brush in hand), the Point (round, square or chalk), Flow, Hardness of the edge and Spacing of the dabs. Under Randomness and pressure you give the stroke some chance (width, scatter, turn, flow) and let a drawing pen's pressure set the width or the flow. New sheets says how fine a new sheet will be (by default 1 pixel = 4 mm). Every dab is decided once on the model and lands as a ball on every face it touches: so a stroke, spatter or a large soft brush runs on seamlessly over edges and over the segments of a round shape.
A brush you have set up yourself is kept under a name with the diskette icon; it then stands with the others. With the download icon you share it as a small file (.wazobrush), with the upload icon you read such a file in. A brush of your own is thrown away with the bin.
Chapter 5
Round shapes
Spheres, domes, cones, rings and egg shapes, whole or in pieces, and your own profile turned round an axis. In WAZO3D a round surface is one surface: you can draw on it, cut into it and paint it in one go.
Placing round shapes
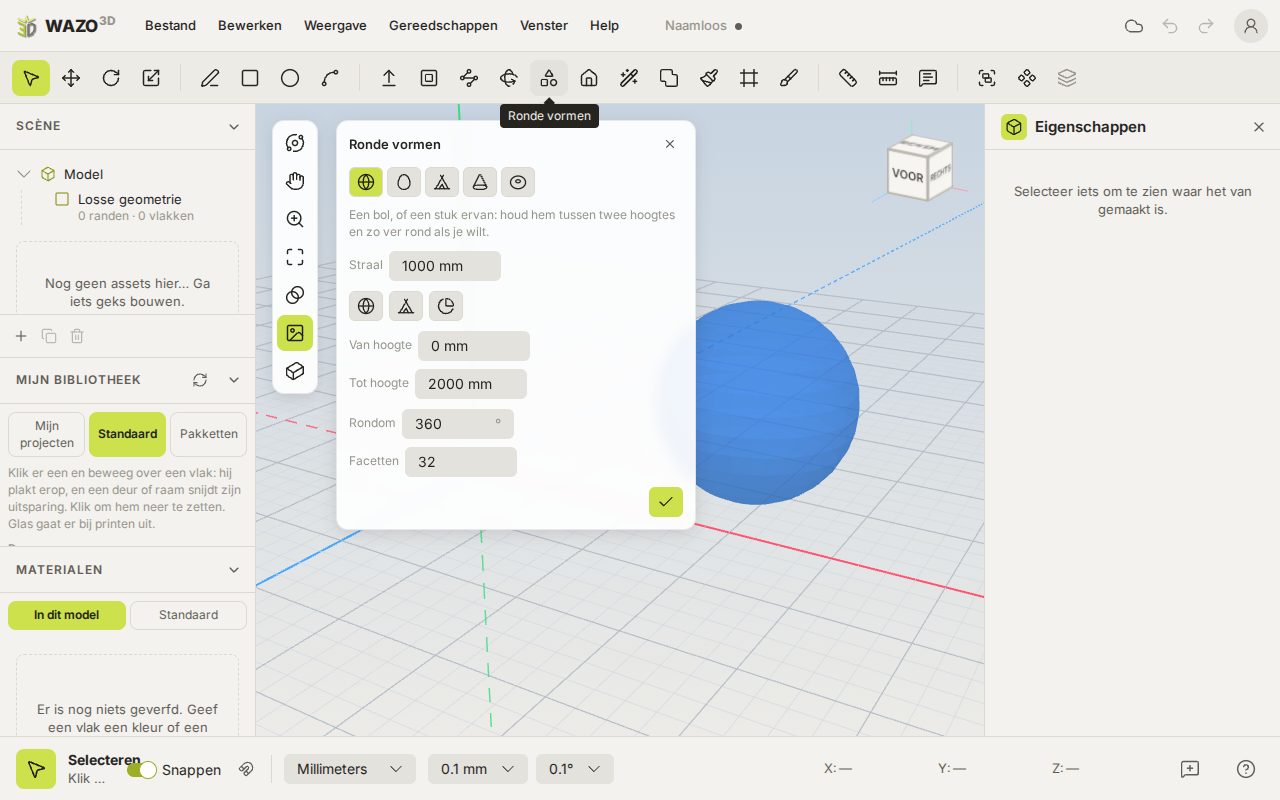
The Round shapes box: the shape stands in view in blue while you change the sizes
The Round shapes button in the ribbon (or Tools › Round shapes…) opens a box with five shapes: sphere, ellipsoid (an egg shape), parabolic dome, cone and torus.
Type the sizes: the radius, and for the ellipsoid, dome and cone the height; for the torus the radius of the tube.
Want only a piece? Choose From height and To height (measured from the foot) and how far Round (360° is all the way round). The buttons Whole, Top half and A quarter of the top half fill that in quickly.
Facets says how many facets the shape has all the way round; along the shape there are half as many. With few facets (6 to 10) you make a low-poly shape, as in games: a sphere of 8 facets is a rock or a treetop.
As long as the box is open, the shape stands in view in see-through blue and changes with every size you type.
Place hangs the shape on the cursor; click where it must stand.
Drawing on a round face, like a sticker
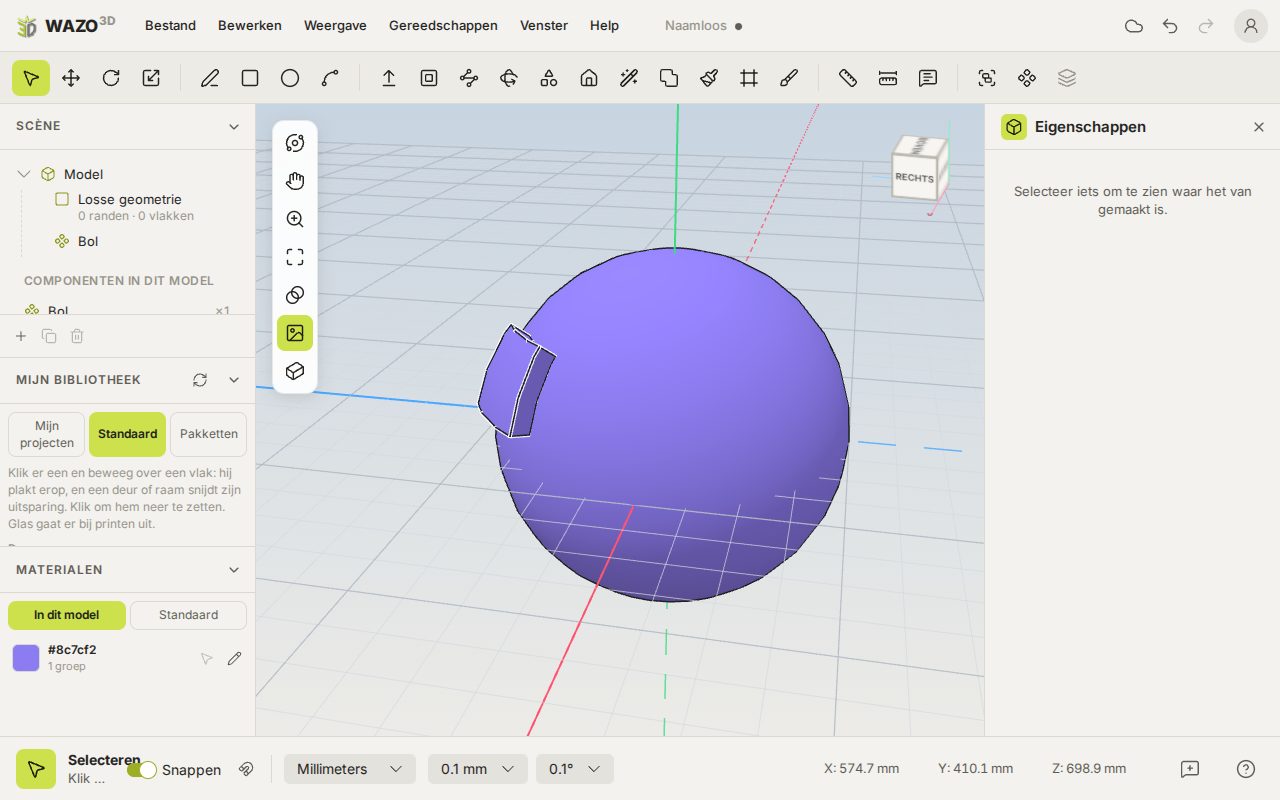
A rectangle drawn on a sphere and pulled out
With Line and Rectangle you can draw on a sphere, dome, cone, torus or cylinder: the lines follow the surface. Click a round shape that is still closed and it opens by itself. A rectangle runs round and along the shape, and its sizes are measured over the surface: type 300;200 for 300 mm round and 200 mm up. When the piece is closed, you can pull it out with Push/Pull (a relief that follows the curve, equally thick everywhere) or push it in (a recess). Circle follows the surface too: the radius is measured over the surface. A click with Select on such a drawn piece selects only that piece (a click on the rest of the shape still the whole shape). With Move you drag the drawn piece over the surface to another place, and with Rotate you turn it over the surface, however far (the rotate gizmo then has one ring, about the piece's normal); the shape stays round and closed. On a round face lines do not snap to the facets' corners nor to the axes, so you can draw a shape freely.
Turning your own profile round an axis
For a dome, an onion dome, a vase, a barrel or a bowl you draw the profile yourself: a face of lines and arcs, with a straight line as the axis in the same plane, the profile wholly on one side of it. Select the axis line, choose Revolve in the ribbon and click the profile. First type 180 for half a turn (or another angle), or 48s for more facets. Every sloping or round edge of the profile becomes one round surface; an edge square to the axis a flat face.
Where a shape is cut off, it is closed with flat faces: it is a solid shape you can print and work on with the solid tools. The round part is one surface: it looks smooth, is selected and painted in one go, and a pattern runs on round it. Round shapes belong to Power; the cylinder (pulling a circle up) stays free.
Chapter 6
Booleans: joining, subtracting and cutting shapes
With booleans you do sums with shapes: two blocks become one, a cylinder drills a hole, and what two shapes have in common is what remains.
The solid tools
The Solid tools box: the result is in view at once
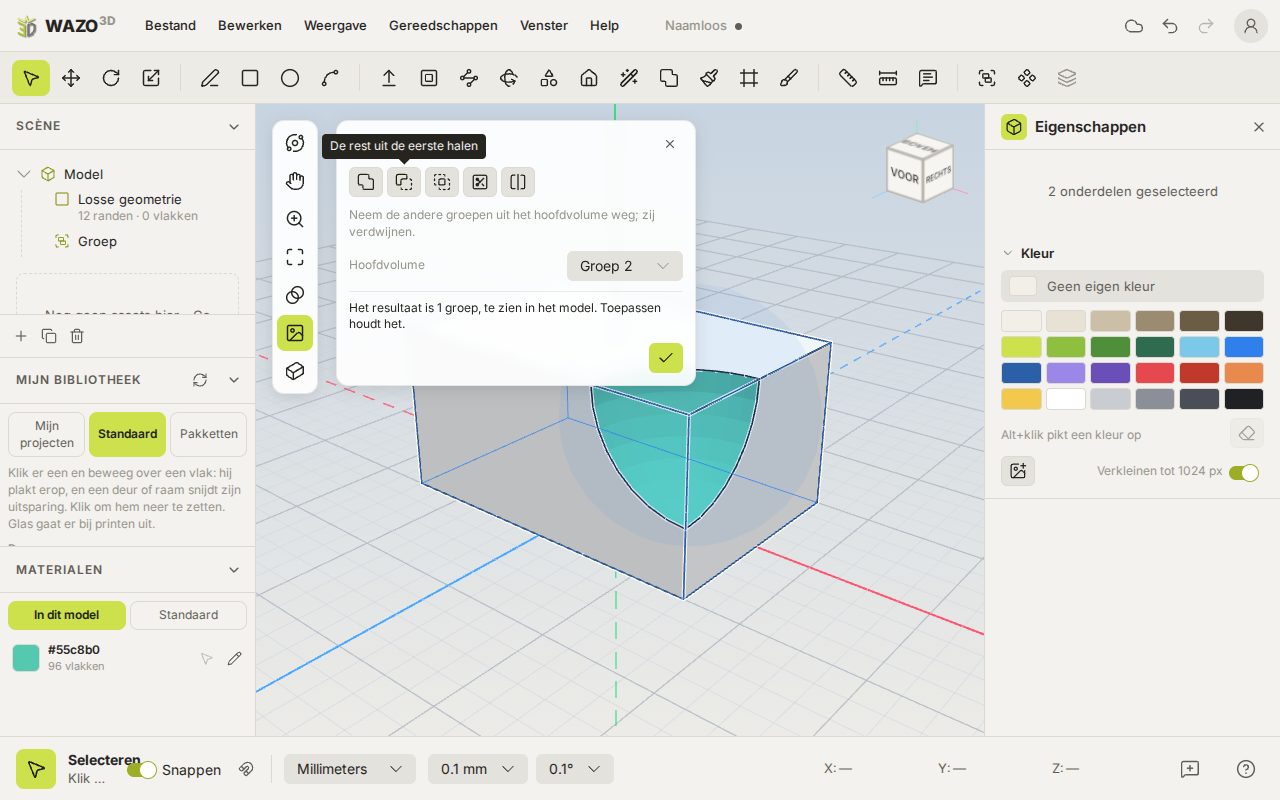
Select two or more groups (Shift+click) and choose Solid tools in the ribbon (or Tools › Solid tools…). A box opens with five icons; the result of the icon you choose stands in the model at once, and you see the groups as they were outlined in blue:
Join into one solid — everything becomes one.
Take the rest out of the first — the body keeps what the others do not take out of it. That is how you drill a hole.
Keep only where they meet — only the piece they have in common.
Trim — like taking out, but the groups that cut stay where they are.
Split into three pieces — two groups become three: what only the first has, what they share, and what only the second has.
For taking out, trimming and splitting you choose under Body which group is the base. Apply (the tick) keeps the result as one step; closing the box puts everything back. When a group is not closed, the box says so and WAZO3D makes it watertight first — in the same step, so one undo puts everything back. Curves become facets after a cut.
Chapter 7
The repair toolbox
A model that comes from elsewhere, or that you have worked on for a long time, can have holes, loose faces or faces inside out. The repair toolbox makes it whole again — among other things so that it can be printed.
Repairing
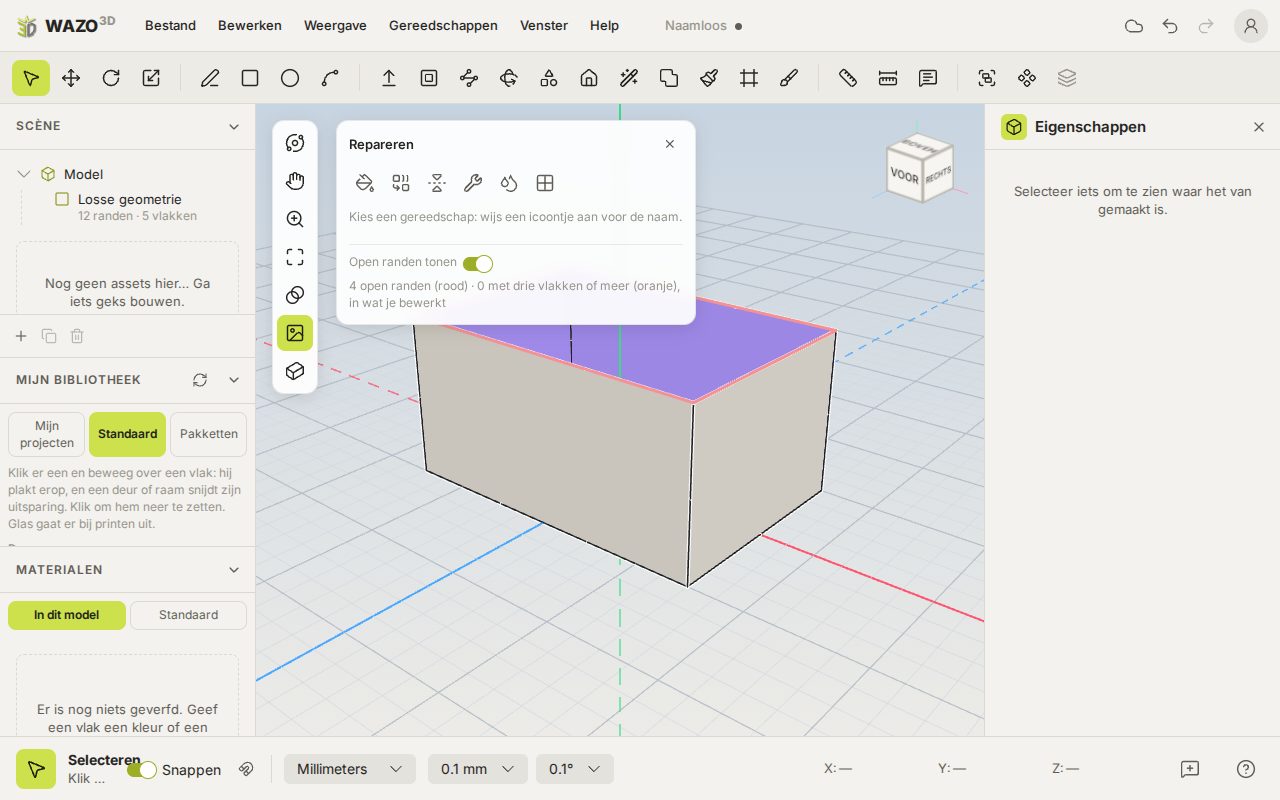
The repair toolbox with Show open edges: red is open, orange is an edge with too many faces
Tools › Repair… opens a toolbox. Click an icon for an explanation and settings:
Tool
What it does
Close a hole
Select a few points round the hole (in order, with Shift+click) and the hole is closed. Lines lying inside it stay open.
Merge into one face
Makes one face of nearly flat pieces. Select nearly flat neighbours finds them for you.
Turn faces outward
Turns faces that stand inside out (violet) outward again.
Repair faces
Pulls back points standing a hair out of the face and welds small cracks shut, within a tolerance.
Make watertight
Makes a closed shape, for 3D printing for example: holes closed, inner faces gone, everything outward.
Find faces again
Lets a line running across a face really divide that face in two — handy with imported models.
The work runs behind a notice with a progress bar; at the bottom of the toolbox it says what was done.
At the bottom of the toolbox is Show open edges: then you see in red where the model is open (an edge with only one face) and in orange where three or more faces stand on one edge. The counts are under it and follow as you work. Open a group first to see its edges.
Merging and Repair faces leave openings open: a hole in a plate gets no lid, even when the model came in as loose triangles.
Chapter 8
Content packs
A content pack is a box of ready-made parts: windows and doors, details for steam locomotives, steampunk, sci-fi. You place them with one click, many of them can be adjusted, and you can make a pack of your own to share.
My add-ons: installing, switching on and off
Tools, plugins and content packs are add-ons. They belong to your account: what you install goes with you to every computer and browser where you log in. That is why you can only install when you are logged in; without an account the editor stays quiet and bare.
You install on the site, under Add-ons: choose one and click Install in my account. WAZO3D's own add-ons are there too: Roofs and Building from a photo (tools), the gear, the model railway wheel and the letters (plugins), and Windows and doors and three packs of details (content packs).
Tools › My add-ons… shows everything you have, in one list: tools, plugins and packs, each with a switch. Switch on what you use; what is off you see nowhere in the editor, but it stays installed. The bin takes it out of your account. The same list opens with the sliders icon in the plugin box and beside My library › Packs. The magnifying glass at the bottom takes you to the site, to find more.
For makers: with the file button at the bottom you load a plugin (.js) or pack (.wazopack) from a file, to try it. It stays in this browser only, is switched on at once, and with the upload icon beside it you put it on the site for everybody.
What a pack is, and how to use it
My library, the Packs tab: WAZO3D's packs with their parts
A content pack is a file (.wazopack) of ready-made parts that somebody made to share: details for steam locomotives, steampunk fittings, sci-fi parts. A pack holds only parts and never code, so loading it is safe.
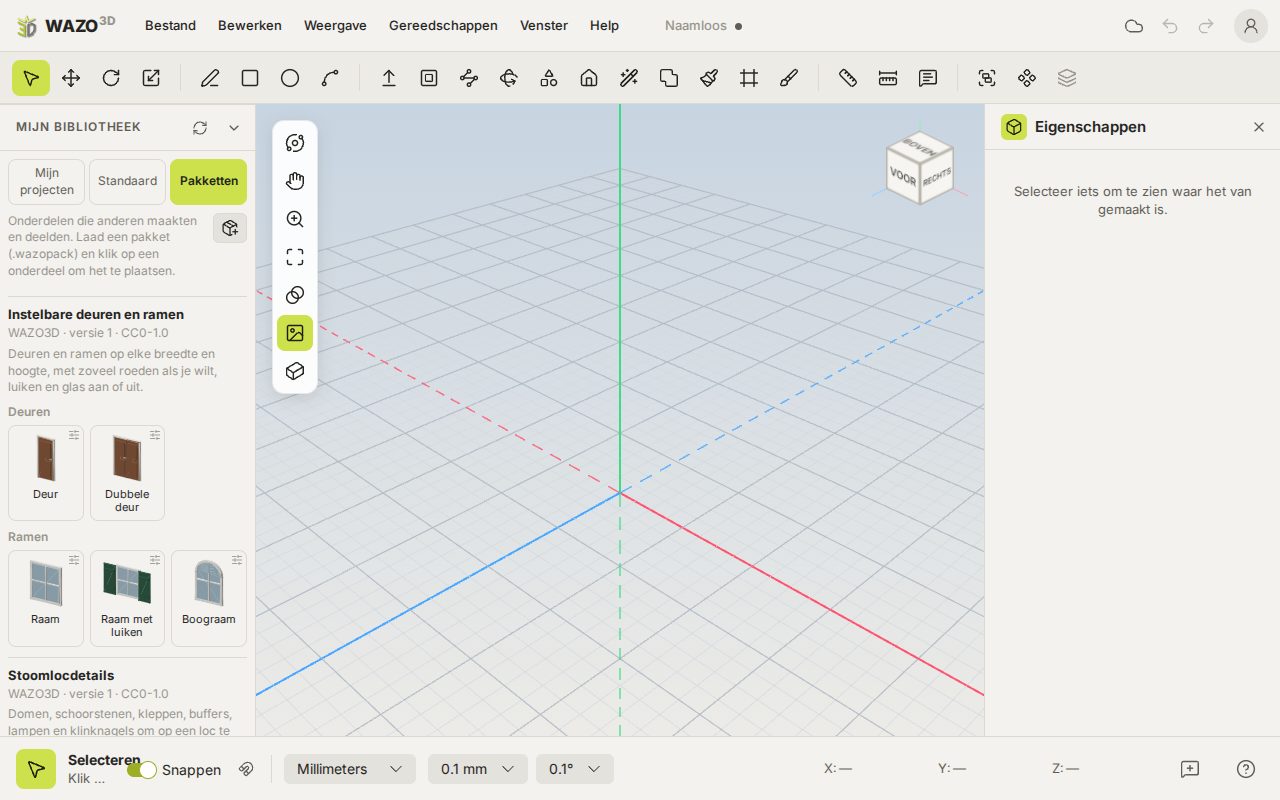
Using a pack. Open My library and choose the Packs tab. There are the packs switched on in My add-ons; the sliders icon beside it opens that list. Click a part and it hangs on the cursor; a click puts it down. Place the same part again and it is the same component, so a change in one shows in all the copies. A part that sticks to faces does so here too, and a part that makes a cutout makes it too.
Parts with settings. A part can have settings: the width and height of a window, the number of bars, shutters on or off. Such a part has a sliders icon. A click on it opens a box with the settings. The part stands in view in blue while you change them, and Place (the tick) hangs it on the cursor. Once it stands in your model, you find the settings again in the properties. A change makes it again, in every copy; make it unique first when you want to change only one. WAZO3D has four packs of its own: Windows and doors and three packs of details. They come up below.
Example: windows and doors
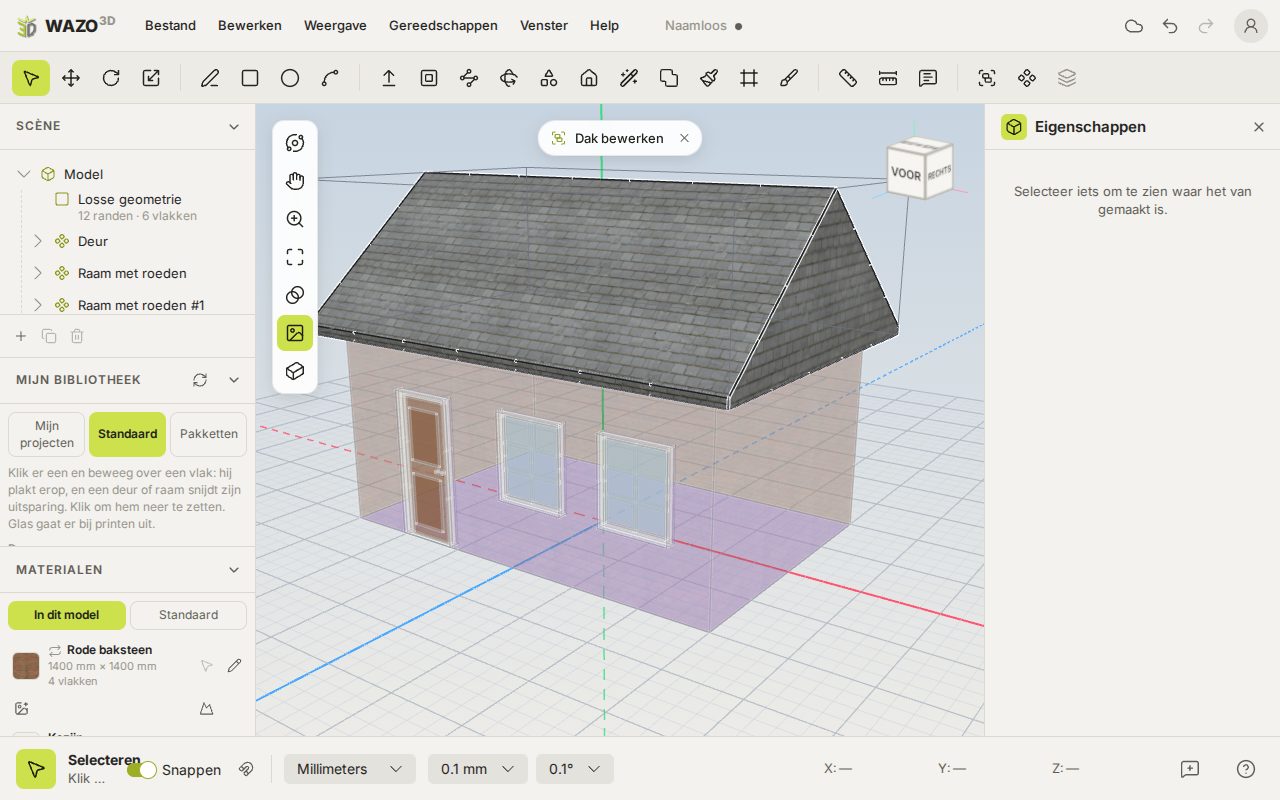
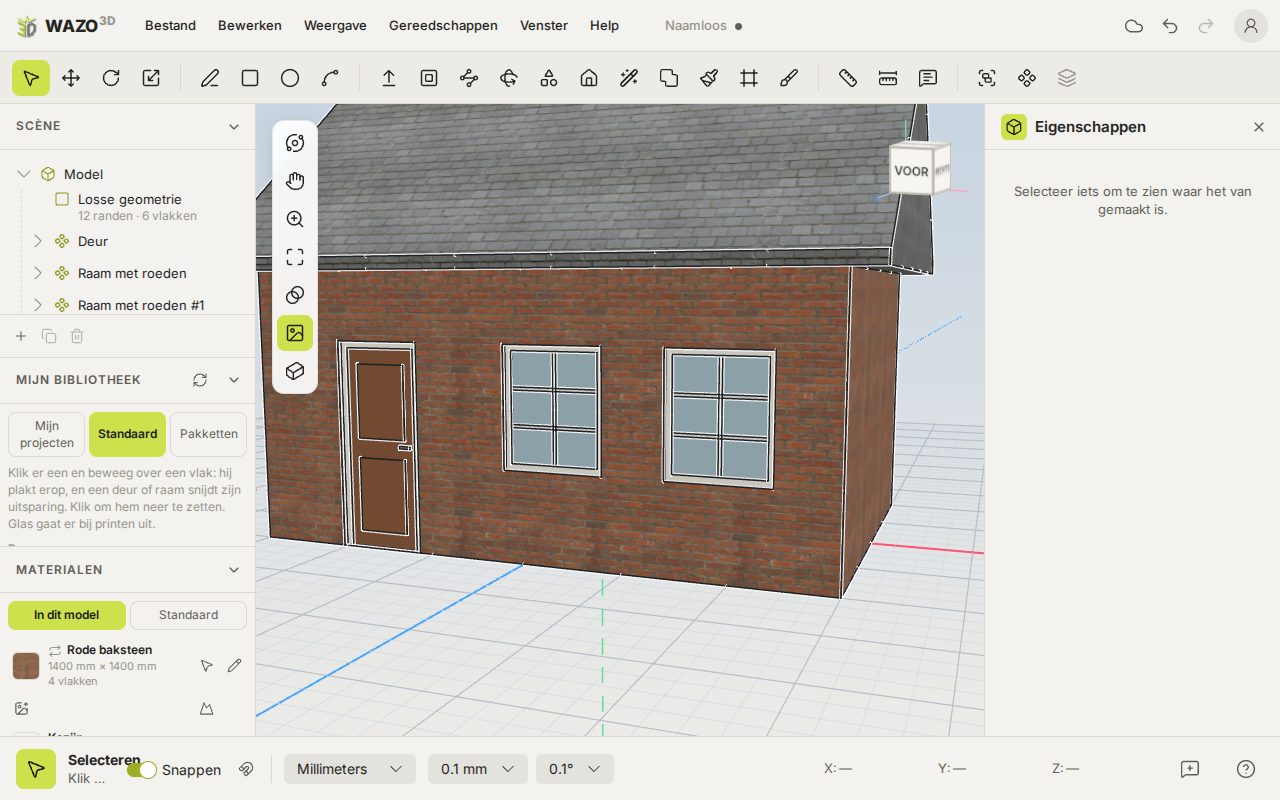
A standard window on a wall: it sticks to it and cuts its hole
Windows and doors are one content pack from WAZO3D: Windows and doors. Install it (see My add-ons) and it is under My library › Packs. It holds 48 ready-made parts, and under the heading Adjustable five whose width, height, bars and shutters you set before placing. They all stick to a wall and cut their own hole (chapter 3, Sticking to faces and cutouts).
The ready-made ones, under their headings: windows, industrial windows, doors, garage and shed doors and industrial doors. Windows: plain, with bars, cross window, sash window, round arch (also with bars), pointed arch, horseshoe arch with lattice, round, lunette, with shutters, with louvred shutters, chalet window with a flower box, French balcony window, roof window, cellar window with a grille, shop window and loading hatch with a hoist beam. Doors: plain, classic panelled door, with glass, stained glass, front door with a fanlight, stable door, modern flat door, plank door with strap hinges, double door, French doors, arched door and shoji screens. Garage and shed doors: garage door (also with windows), steel roller shutter, folding door and loading dock door with a dock shelter. Industrial: steel window, window band, large steel window, arched factory window, tall hall window, window with a vent, curtain wall panel; and among the doors double steel door, station door, steel emergency door, sliding door, goods shed doors, arched warehouse doors and locomotive shed doors. Click one and move over a wall: it sticks to it and cuts its hole. Click to put it down. The same one placed again is one and the same component. The size can be set: select a placed part and under Standard component type the width and height of the hole, and for steel windows the pane size (the bars are spread so the panes come as near to it as they can). All the copies change with it; make one unique first to change only that one. A door is held by the middle of its bottom edge, a window by its bottom edge: put it at the height of the sill. The glass is left out for STL (printing), so the window is open.
Giving it a colour or picture of your own: every window and door consists of one group per material: frame, glass, door, handle, shutters… Double click the part open and with the paint bucket give one group a colour or picture in one click; all the copies change with it. To do it in the whole model at once, change that material (for example Frame) in the Materials panel.
Example: roofs
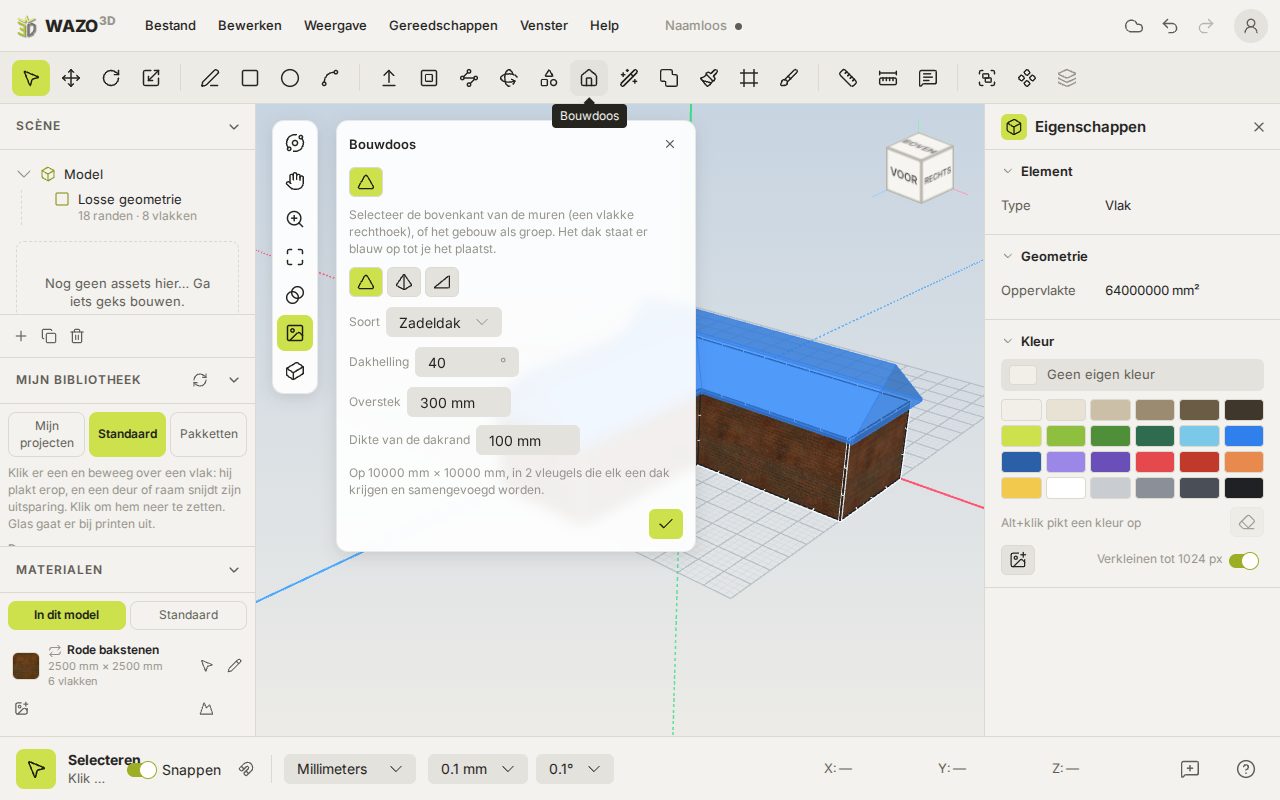
A roof on an L-shaped building
Install it first. Roofs is an add-on of WAZO3D's own, for those who need it. Install it on the site under Add-ons (logged in), or switch it on in Tools › My add-ons…. See My add-ons.
Roofs is not a pack but a tool: it works out the roof on what you have selected. The button with the little house in the ribbon (or Tools › Roofs…) opens it.
Select the top of the walls, or the building as a group. The roof stands on it at once in see-through blue and follows every setting.
The top may be a rectangle, but also an L, T, U or cross: any shape with only right angles. WAZO3D divides it into wings, gives every wing the roof and joins them into one closed shape. With a roof that has a ridge, the largest wing runs through and the side wing stops against its ridge, with valleys in the inside corners; with a hip roof the hips run round the corners.
The three most common roofs are buttons: Gable roof, Hip roof and Shed roof. Under Kind are all of them: also pyramid roof, flat roof with an edge, butterfly roof, gambrel roof, saltbox roof, M-shaped roof, monitor roof (a lantern over the ridge, as on a locomotive shed), sawtooth roof (with the number of Teeth), barrel roof, mansard roof, half-hipped roof and Dutch gable roof.
Pitch in degrees, the Overhang all round and the Eave thickness, so the edge is not a knife. The ridge runs along the long side; Ridge across the short side puts it across the short side.
Drawn to scale? The overhang and the eave follow the size of your building until you type them yourself: a little shed of 70 by 46 mm for H0 gets 3.5 mm of overhang and an eave of 1 mm, a real building 4 metres wide 300 and 100 mm. The pitch is an angle and is right at any scale.
Place the roof puts it on as a group of its own, Roof: a closed shape, so ready to print. One undo takes it away.
Example: steam locomotive, steampunk and sci-fi details
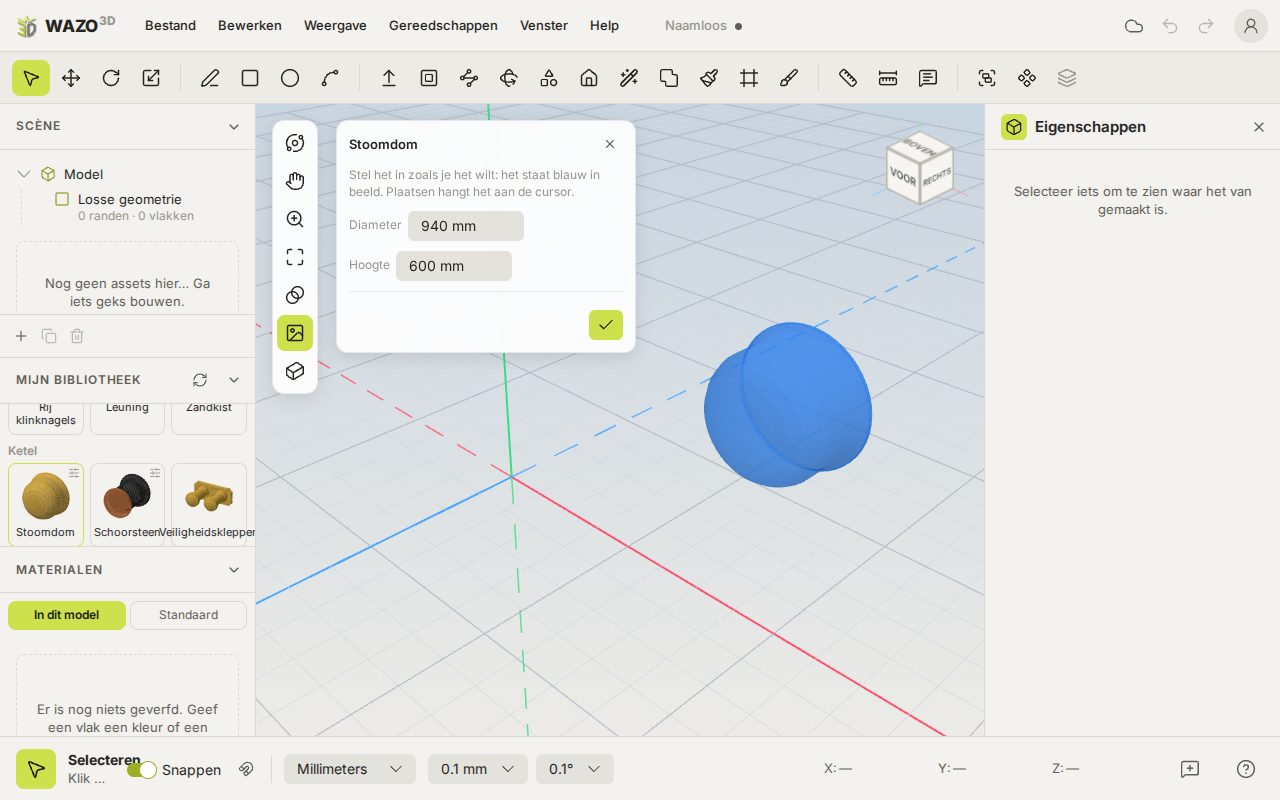
A steam dome, set up and stuck upright on a boiler
WAZO3D comes with three packs of details, always under Packs:
Steam locomotive details: steam dome, chimney, safety valves, whistle, buffer, buffer beam, head lamp, smokebox door, a row of rivets, a handrail and a sandbox.
Steampunk fittings: cogs, a pressure gauge, a valve wheel, a lever, a pipe with flanges, a riveted plate and a porthole that makes its own hole.
Sci-fi details: a hull panel, a vent grille, a light strip, an antenna, a thruster, a pipe bundle, a greeble block and a sliding hatch that makes its own doorway.
The parts are at real size and stick to the face you put them on. So a steam dome on a boiler stands upright on the boiler. Many of them have settings, such as the diameter, the length or the number of rivets.
Making a pack of your own
Making a pack of your own. Draw your parts in one model and make each one a component (select it and click Component). Put components that belong together in a group: that group's name becomes the heading they stand under in the pack. Then choose File › Export… › Content pack, give the pack a name, your own name, a version and if you like a licence and a description, and click Make the pack. Every part gets the name the component has in your model. What a component can do, the part can do too: colours, pictures, sticking to faces, making a cutout.
Making settings of your own. Select a component of your own and in the properties click Settings for its users….
Under Settings you add what the user may choose: an id you use in formulas (for example width), the kind (length, number, count or switch), what it is called and the starting, lowest and highest value.
Under Rules you say what happens.
Stretch moves everything past a line, by for example (width - 1000) / 2.
Scale makes a part larger from a middle, so an arch stays round.
Repeat puts a group in the part down a number of times, such as bars.
Show keeps a group only when a formula is true, such as shutters.
Positions are millimetres in the component's own axes: x to the side, y up, z forward. Under Try it you see the result in blue in the view. Keep these settings on the component (the tick) puts the settings on the component; a pack of this model then takes them along. A formula only calculates, no code can go in it.
Making your pack available
On the site. Under Add-ons on the WAZO3D site are packs and plugins for everybody, our own examples first. A pack you loaded from a file goes there with the upload icon beside its name, in My add-ons (you must be logged in). It gets a page of its own, which opens at once in a new tab. A new version goes up the same way, or on the site under My add-ons in your personal menu: the same id, with a higher version number. A published version never changes again. The id belongs to whoever published it first, so nobody else can replace your pack.
Installing. The page of a pack or plugin has Install in my account. After that it is in the editor, on every computer where you log in.
A pack is also simply one file (.wazopack): you can share it by mail or through your own website too. Whoever has it loads it in My add-ons with the file button (in that browser only). Say under which licence others may use it (you give it when making the pack). A pack holds only parts and never code, so whoever loads it runs no risk.
When your pack changes later, raise the version. Whoever loads the new pack and places a part again gets the new version; what already stands in a model stays as it was.
Chapter 9
Plugins
A plugin gives you something new to make: a few settings in, a shape out. WAZO3D comes with three examples — a gear, a model railway wheel and letters — and anybody who knows a little JavaScript can write one.
Using plugins
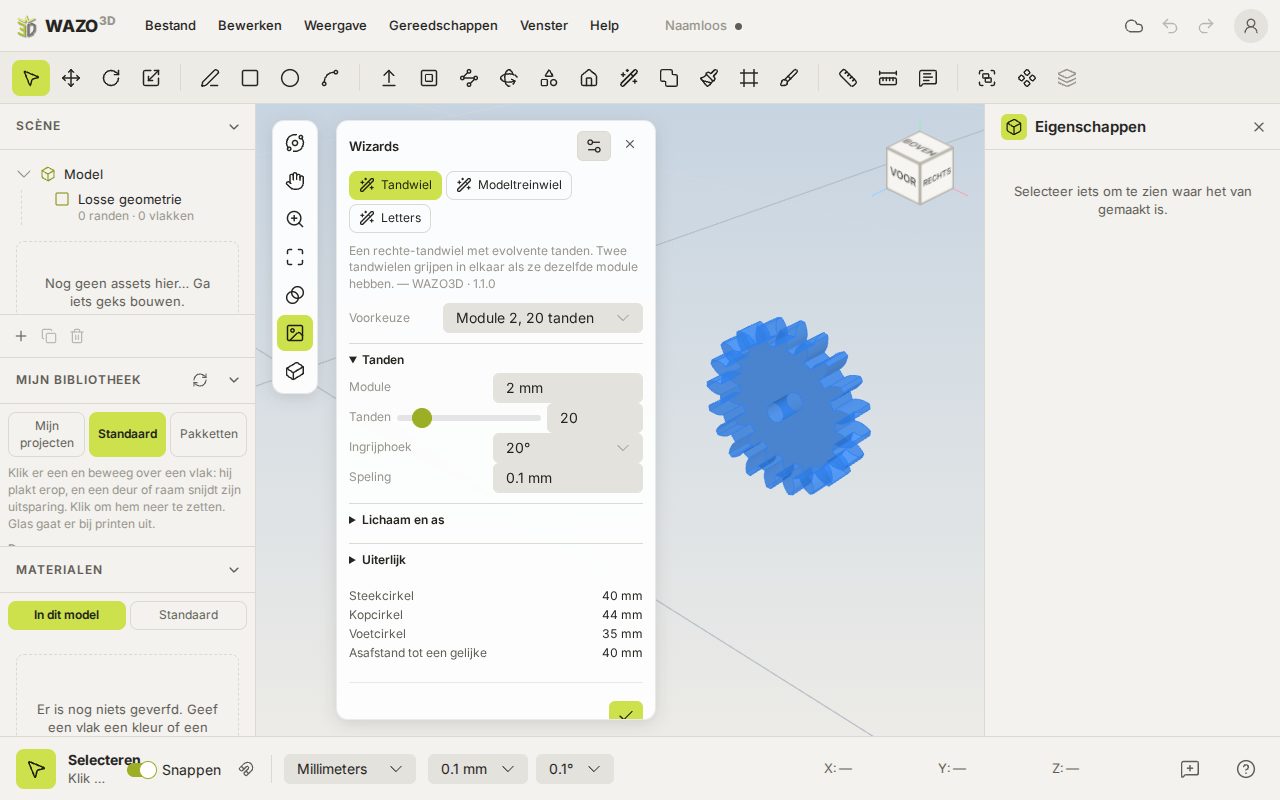
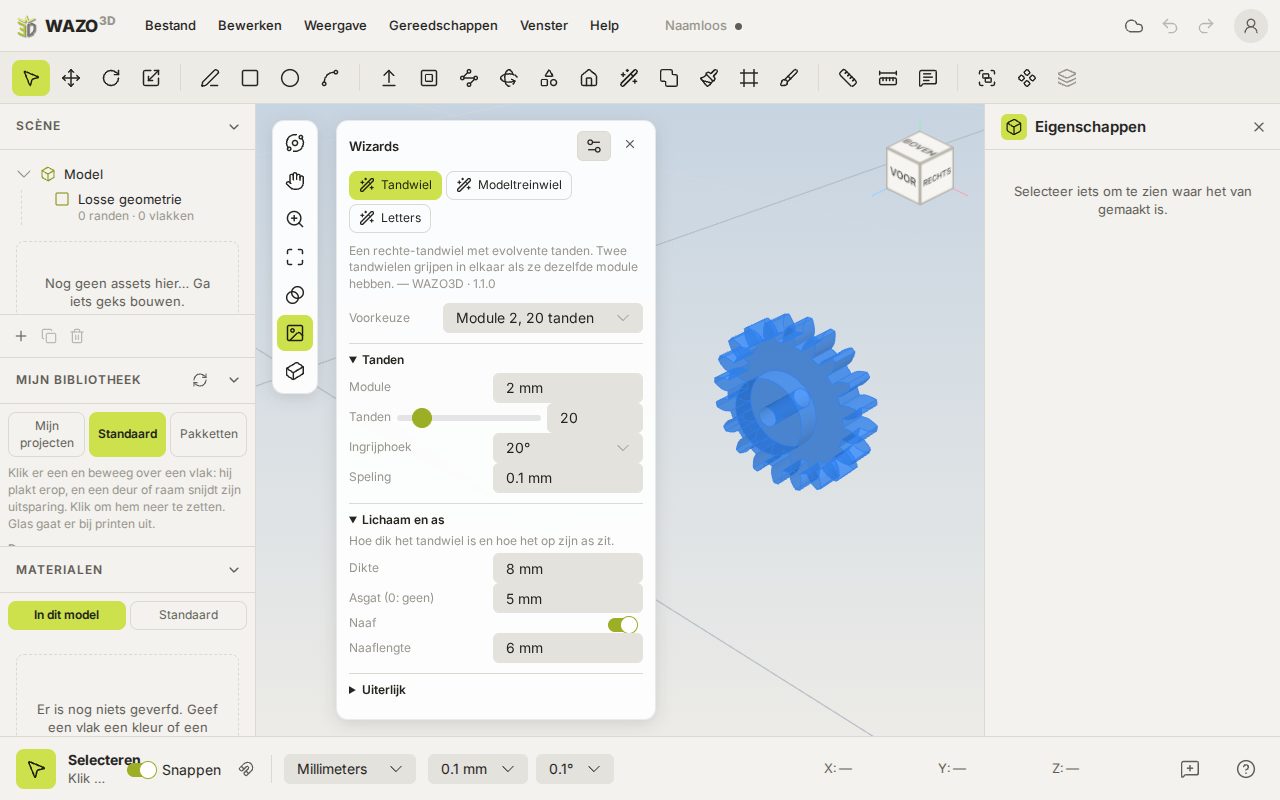
The Gear plugin: headings, a slider, presets and what it works out
Tools › Plugins drops down a submenu with the plugins you have installed and switched on; choose one and that plugin's box opens, with its name at the top. You choose another plugin in that submenu again. What is in it you arrange in Tools › My add-ons… (see My add-ons). A plugin asks for a few settings and shows the result in see-through blue in the view while you change those settings. Place (the tick) hangs it on the cursor; a click puts it down, as one group that one undo takes away again.
The settings are under headings you fold open and shut. A setting that does not matter right now disappears from view, such as the hub length while the hub is off. At the top there is often a Preset: a ready-made set of values, which you can still adjust afterwards. Under the settings the plugin shows what it has worked out, such as a gear's pitch circle or a wheel's printed size, and sometimes a warning.
Somebody else's plugin. Install it on the site, or load its file (.js) in My add-ons with the file button to try it. A plugin runs sealed off: it does not see your model, your account or the page, cannot send anything over the internet, and is stopped after five seconds if it keeps calculating. All it can do is hand WAZO3D shapes.
Making a plugin of your own
A plugin is one JavaScript file. It says what the plugin is, which settings it asks for, and it has a function build that turns those settings into build steps: an outline pulled out backward, a profile turned round an axis, a hole cut into it, a colour. WAZO3D builds those steps into one closed shape.
The smallest thing that works, a plate with a hole:
Save it as plate.js and load it in the list of plugins (see Using plugins). Every change is loaded again with the same file: the same id replaces the old one.
You describe the dialog, WAZO3D draws it
A plugin puts nothing on the screen itself. It describes its dialog and WAZO3D draws it in its own style and in the user's language. What you can describe:
Settings of these kinds: a number (with a unit, and a slider if you like), a choice, a switch, a text, a font and a file of the user's own (a table of sizes, for example).
Headings (sections) to group settings, open or folded shut.
Settings that only matter sometimes (when): the hub length only while the hub is on.
Presets (presets): a ready-made set of values with a name.
What the plugin works out: besides the steps, build may also hand back numbers (figures) and warnings (notes), which appear under the settings.
Safe, even when the code is somebody else's
A plugin runs sealed off: in a frame of its own without access to the page, your model, your account or the internet, and it is stopped after five seconds. What it hands back is checked once more. The worst a plugin can do is hand you a shape you do not want, or fail.
The code of the three examples and of the locomotive chassis each has a page of its own, in colour and with speech bubbles explaining what happens: gear, model railway wheel, letters, locomotive chassis. The button at the top copies it in one go. It is open source: you may do anything with it.
The full explanation for writers is in README.md, with the exact description of every field in wazo-plugin.d.ts (for editors that read TypeScript).
Developing and testing plugins: the plugin editor
The plugin editor is a free add-on from WAZO3D, made to write plugins in. Install it on the site under Add-ons (or switch it on under Tools › My add-ons). A code icon then stands in the ribbon, and Tools › Plugin editor… opens it too. It opens in a window of its own beside the editor, not a tab, so that you see the code and the result side by side.
Starting: New… asks for a name and what you start from: an empty plugin, a block with a hole, or a copy of an example (gear, model railway wheel, letters). The name becomes the plugin's name and its id (me.…). Every project is kept in this browser; at the top left you choose which project is open, and the little bin throws one away. The sun or moon switches between light and dark.
Writing: the editor knows the plugin API. It completes what you type and puts a squiggly line under mistakes, syntax errors too; they are also listed under Problems, and a click takes you there. Ctrl+F searches, Ctrl+H replaces. On the left is the Outline: every function, class, method and variable, a click away (Ctrl+Shift+O does the same from the keyboard).
Committing (Ctrl+Enter or Ctrl+S): the plugin is kept in this browser, switched on, and its dialog opens in the editor with the new code. Change, commit, look: that is the whole loop. At the top right it says whether an editor is open to commit to.
Checking runs the plugin the way the site does before it is published: with the default values and every preset, and says what it made, how long that took, which plan placing it asks for and what stands out.
Files: a plugin is one file, so what it needs goes into the code. Insert a file puts a file at the bottom of the code, out of the way, as a function named after the file that returns it: text (.txt, .csv) as text, .json as a value, everything else as bytes (at most 96 kB), and an SVG as an icon of your own for the ribbon button (button: POST()). Pictures and fonts are better left out: a plugin paints with WAZO3D's standard textures and lets the user choose a font, so it stays small.
Saving and publishing: Save file writes the .js file. Publishing goes through the site: in the editor, under Tools › My add-ons, there is a publish button beside your own plugin, and on the site it waits under My add-ons until you publish it there.
What you type is kept in the plugin editor, even when you close the window. Prefer another code editor? That works too: save the file and choose it under Tools › My add-ons with the file button; choosing it again after a change replaces it.
A button on the ribbon: a plugin may put a button on the ribbon itself that opens its dialog, with button: 'cog': an icon from WAZO3D's list (gear, wheel, letters, train, box, star…), or an icon of your own from an SVG you put in the code with Insert a file. Only the lines of the SVG go along, never anything else. Questions about making plugins are asked on the forum, under Plugin development.
Making your plugin available
A plugin is one file. You can put it on the site (below), or share it like any file: by mail, on your own website or on GitHub. Whoever gets the file loads it with the file button in My add-ons. A few agreements make it easier for others:
Give your plugin an id that is yours, with your name or site in front (yourname.plate), so that it does not replace somebody else's.
Raise the version when you change something. A plugin with the same id replaces the old one.
Add a licence, with licence: 'MIT' in the plugin. WAZO3D's examples are MIT: copying, changing and sharing are allowed.
Give names and explanations in English, Dutch, German and Spanish, so that everybody sees it in their own language.
On the site. Under Add-ons on the WAZO3D site you put your plugin out for everybody: open Tools › My add-ons and click the upload icon beside your plugin (you must be logged in). WAZO3D tries the plugin first, sealed off the way the editor runs it: with its default settings and every preset. If it makes nothing, or does not load, it is not published. From the build steps WAZO3D reads which plan is needed: round shapes (turning round with a sloping or curved side) ask for WAZO Power, a cylinder does not. That is shown on the plugin's page, and the editor checks it again every time it is placed. On the site, under My add-ons in your personal menu, you see your plugins with their downloads and how many accounts use them; for each plugin you set its name and description per language there, a picture, a price (selling comes later), and you put up a new version, which is tried the same way first. A published version never changes again: a new one gets a higher number. What the plugin says about itself — name, description, version, maker and licence — is then on its page, with its code beside it, so others can read what they install. An id starting with wazo3d. belongs to WAZO3D itself; put your own name in front.
Example: the gear
The gear with a hub, and under it the circles it works out
What it does. A spur gear with real involute teeth, ready to print. The module and the number of teeth set the size: two gears with the same module mesh, at an axle distance of the sum of their pitch circles divided by two. Backlash takes a fraction off every tooth, so printed gears turn freely. With an axle hole and, if you like, a hub. Under 17 teeth (at 20°) it warns of undercut.
How the code is put together (gear.js, explained). The gear uses every part of the dialog once, so it is the reference example:
presets — four ready-made gears; each sets only the module and the number of teeth.
sections — Teeth, Body and axle, Look.
The setting teeth has slider: true, and hubLength has when: { hub: true }.
In build it first works out the circles (pitch, base, tip and root circle), then for each tooth the flank with the involute function inv(a) = tan a − a. That gives one outline with all the teeth, which one extrude step turns into a gear; the axle hole goes along as a hole (holes) and the hub is a revolve step.
At the end it returns not a list but { steps, figures, notes }: the circles as numbers, and the warning about undercut.
Example: the model railway wheel
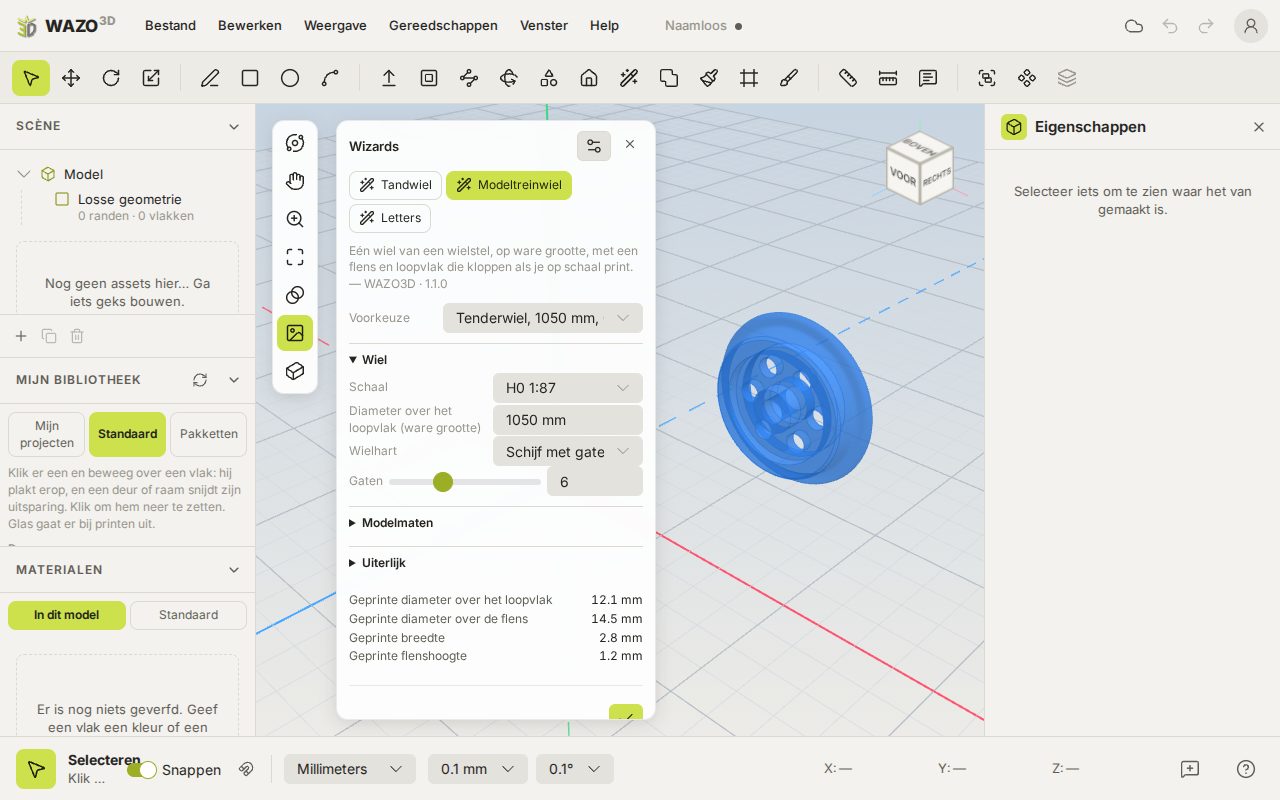
The model railway wheel as a disc with holes, with the printed sizes under it
What it does. One wheel of a wheelset, at real size, with a tread and flange that are right when you print at the chosen scale (Z, N, TT, H0, 0). With a disc, spokes or a disc with holes, and a tyre thickness of your choice (0 is the usual one). A steam locomotive's driving wheel gets, under Crank pin and balance weight, a crank pin between two spokes (cast in a web) or on a spoke, with the crank throw and the size of its hole to set, and a balance weight opposite the crank pin, as far round as you like. Under Axle you choose a round hole, a cross hole for a LEGO axle or an axle stub with a LEGO axle end; the LEGO sizes are printed sizes, whatever the scale, with a clearance you set for your printer. The sizes of flange and tread are close to NEM 310, but they are a starting point: check them against the standard and adjust them under Model sizes (0 means "the value for the scale").
A table SCALES gives per scale the ratio and the model sizes of tread, flange and axle.
The wheel is a profile: a list of points (distance from the axle, depth) for the rim with tread and flange, and a second one for the hub. Each is turned round the axle with a revolve step.
Spokes are extrude steps, one per spoke, set all round; holes in the disc are cut steps.
The crank pin stands at angle nought: between two spokes turns the spokes half a step. The balance weight is a crescent opposite the crank pin, the pin's hole a cut step.
The LEGO axle has its own sizes in printed millimetres (LEGO); these go back to real size, so that they fit exactly once printed.
The settings spokes and holes take turns with when, depending on the wheel centre chosen.
As figures it gives the sizes as they come out printed, to check against the standard.
Example: letters
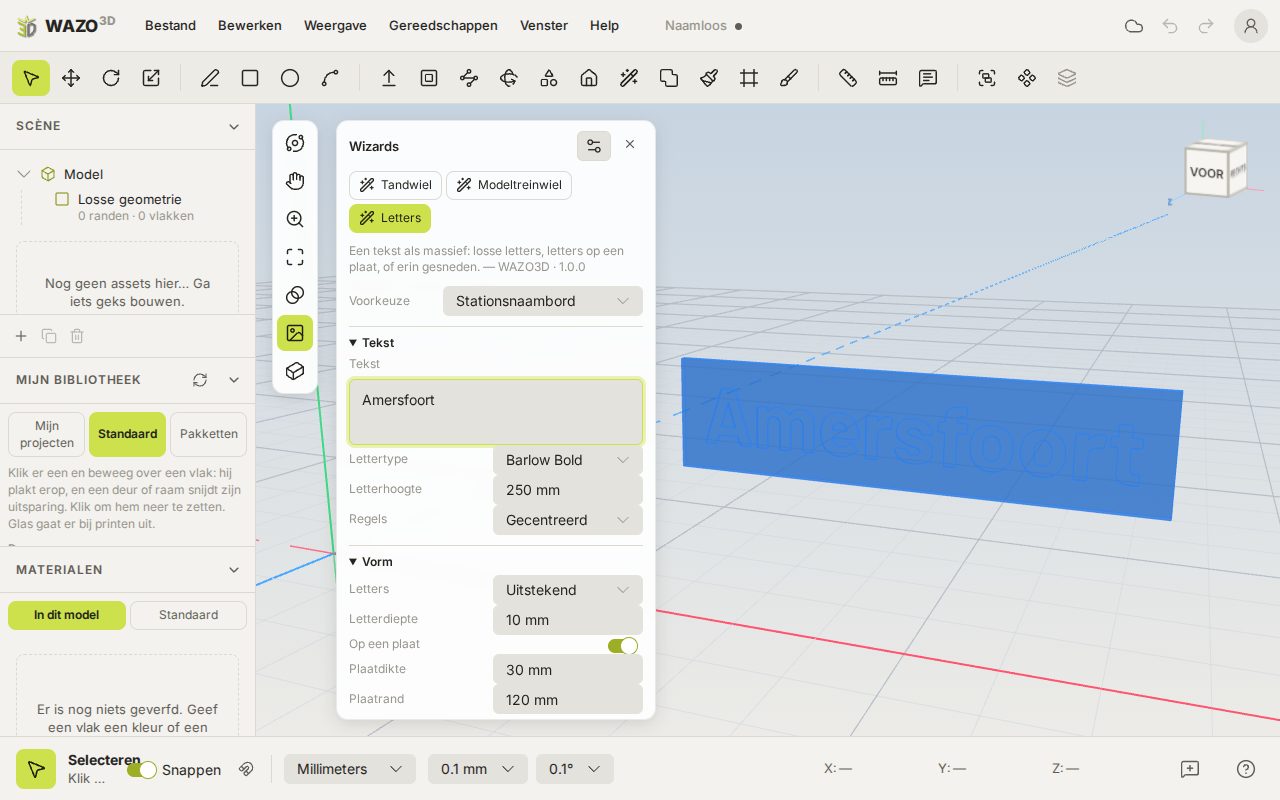
Letters as a station name board: white letters on an enamel plate
What it does. A text as a solid: separate letters standing out, letters on a plate, engraved in a plate, or cut right through it like a stencil. Choose one of WAZO3D's sixteen fonts (Barlow, Roboto Slab, JetBrains Mono, Allerta Stencil, Patrick Hand, Oswald, Bebas Neue, Nunito, Pacifico, the gothic UnifrakturMaguntia, the typewriter letter Special Elite and the art deco Poiret One) or load your own font: choose Load a font of your own… in the list and take a .ttf, .otf or .woff file. It is kept in your browser and stands in the list from then on; the little bin beside it forgets it again. Then choose the letter height (the height of a capital) and more lines if you like. A character the font does not have is left out, and that is said under it. Presets: station name board, house number, stencil plate, engraved name plate.
How the code is put together (text.js, explained). A plugin cannot read a font file, because it sees nothing outside itself. So WAZO3D reads the font the font setting chose and hands it over as the second argument of build:
Everything is in em (the size of the font), so the plugin first works out how many millimetres one em is: the letter height asked for divided by capHeight.
Then it slides a "pen" along every line: every letter goes where the pen is, and the pen moves on by the letter's width (advance), the kerning with the next letter and the letter spacing.
Every shape of a letter (the B is one outline with two holes) becomes an extrude step. When engraving, every letter becomes a cut step and the inside of an O is put back with an extrude.
An add-on: the locomotive chassis
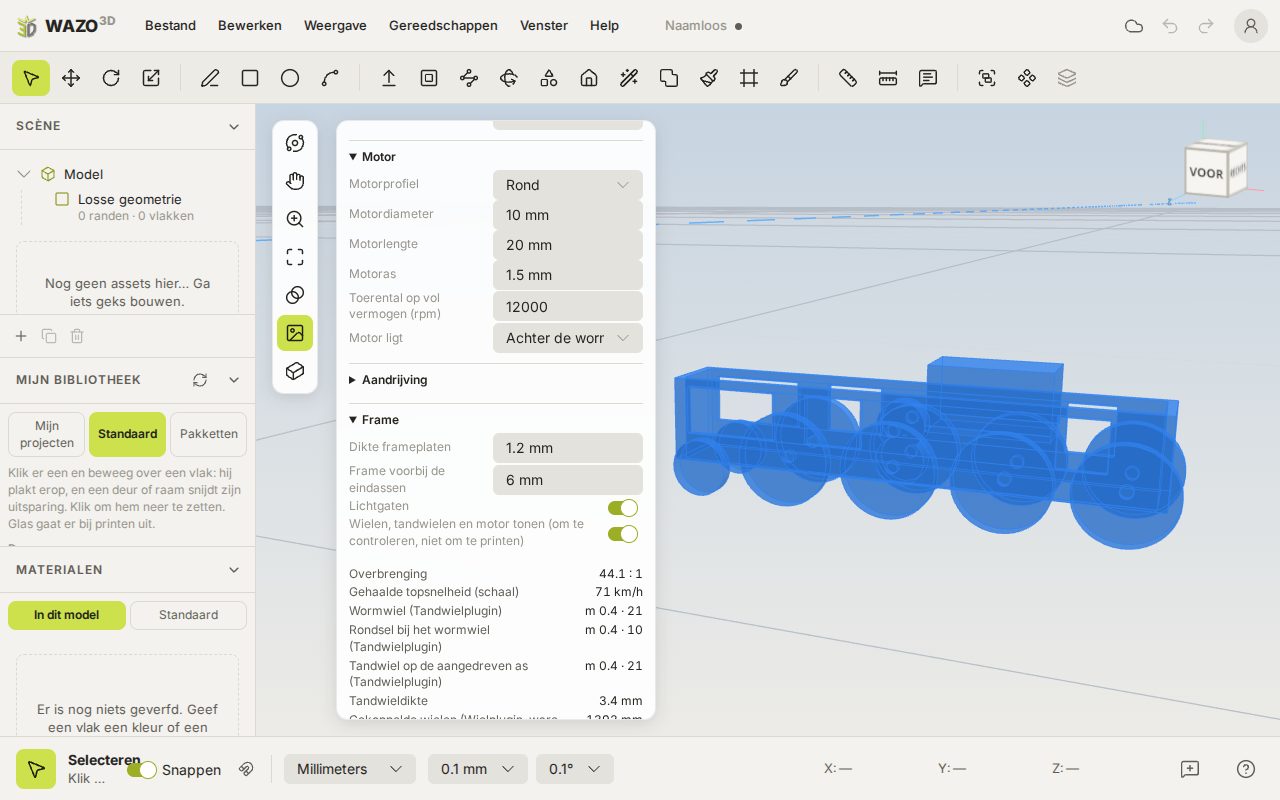
The chassis of a 2-8-0 with the wheels, gears and motor shown to check, and under it the drive and the gears
The locomotive chassis is not an example from WAZO3D but an add-on by a member: install it under Add-ons.
What it does. A chassis for a model locomotive, as light as possible, with the drive worked out. You give the wheel arrangement (0-4-0 to 4-8-2), the wheel diameter and the axle spacing, the axle thickness, the motor (round or flat, its sizes, its speed and where it lies) and the top speed wanted at scale. The plugin makes two frame plates with bearing holes and lightening holes, end beams and a cradle for the motor, and tells you which gears to make with the Gear plugin, which wheels with the Wheel plugin, and which worm to buy. The chassis is drawn in model millimetres, to print at 1:1: motor, gears and axles are real parts.
With Show wheels, gears and motor you see whether everything fits; those shapes are to check, not to print. What does not fit is said: a motor too wide for between the plates, a speed the gears cannot reach, wheels too small for the module.
From the top speed and the motor's speed follows the gear ratio needed.
The largest gear on the driven axle must stay clear of the rails. If the worm wheel fits on it, the worm goes straight onto it; otherwise one stage of spur gears is added.
The motor lies lengthwise, with the worm on its shaft, and starts only where it is clear of the worm wheel.
The frame plates are two extrude steps with the bearing and lightening holes as holes; the end beams and the cradle hold them together.
Chapter 10
Building from a photo
Put a photo of a real building in your model, straighten it or let WAZO3D work out the camera, and draw over it.
Reference photos
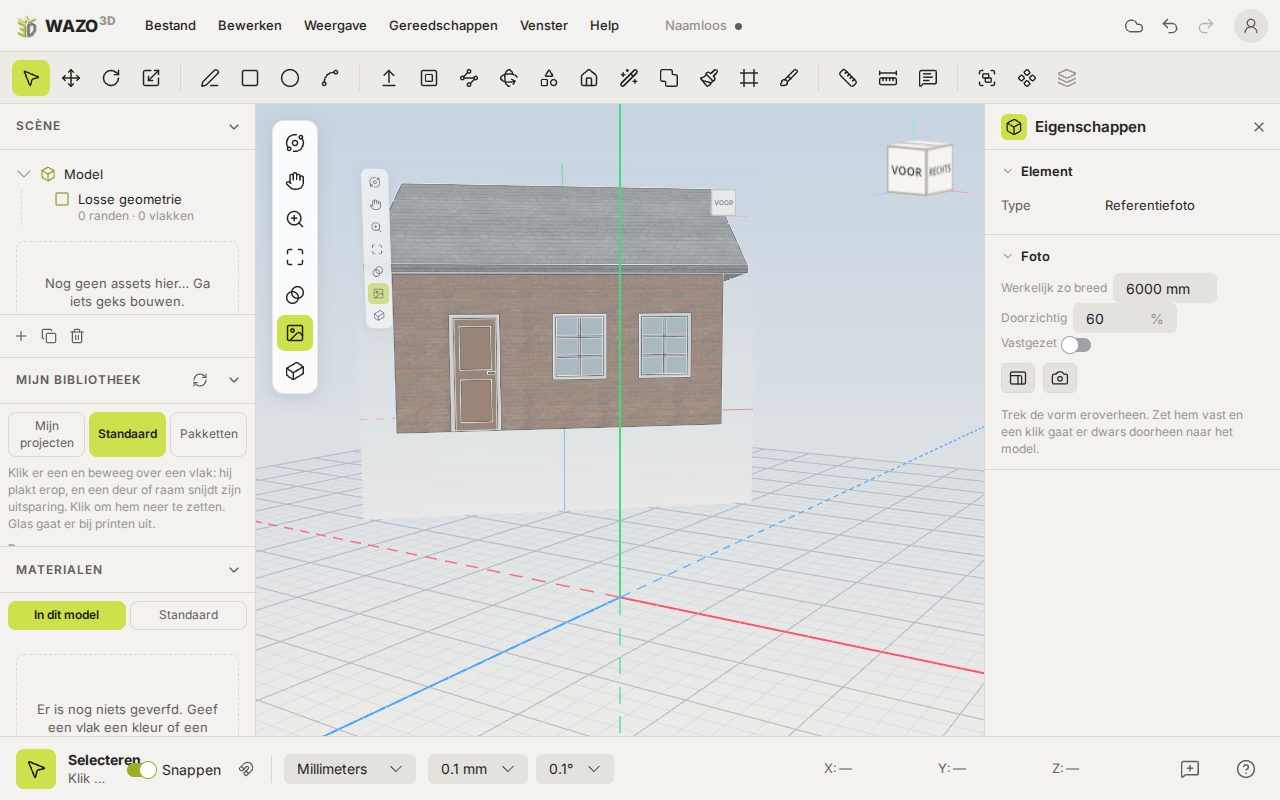
A reference photo upright in the model, half see-through, to draw over
Install it first. Building from a photo is an add-on of WAZO3D's own, for those who need it. Install it on the site under Add-ons (logged in), or switch it on in Tools › My add-ons…. See My add-ons.
File › Reference photograph… puts a photo upright in your model, on the ground, square to the way you look. In the properties:
Really this wide — the real width; the height follows by itself.
Shows through — how much of it shows through while you draw over it.
Drawn lines keep a light rim, so they stay easy to see on a dark photo too.
Locked — then a click goes straight through it to the model.
Does what you draw cover the photo? Make the model see-through with X: the faces become glass, the lines stay.
You simply draw on the photo. Lines, rectangles and circles land in the photo's plane — also when it is locked; that is exactly why you lock it. Would you rather draw on the ground, move the photo aside for a moment or delete it.
The photo stands behind the model: a face you draw over it covers it neatly. It goes along in your file, but never in an export. There are two ways of dealing with perspective:
Straighten the photograph — putting the photo square
Choose Straighten the photograph….
Drag the four blue corners onto the corners of something that is a rectangle in reality: the façade, a gable, a window. Keep them in order all round.
Type under Really this wide and Really this high how big that is in reality.
At the bottom of the toolbox, click the icon Straighten.
The photo is made again as if it had been taken straight from the front. The four corners only say what is straight — the whole photo goes along, with that rectangle in it at the size you gave. So you have a façade at 1:1 to trace over or to put on a face as a pattern, with its surroundings still round it. The corners of the new picture are see-through: the photo did not reach there. One undo gives back the original photo.
What lies close to the horizon is stretched without end and is worth nothing any more; WAZO3D leaves it out. So the picture runs on at most one and a half rectangles beyond the corners.
Match the photograph — working the camera back
Choose Match the photograph…. The photo becomes the view's backdrop.
Lay the two red bars on edges running one way over the ground (for example the bottom and top edge of the front façade), and the two blue ones on edges running the other way (the side façade).
Drag the black point to where your model's origin must come — usually a corner of the building on the ground.
Drag the green point along red to a distance you know, and type that distance under That far along red.
The camera goes and stands where the photographer stood. Now you draw over the photo with your ordinary tools and it comes out in the right place in 3D. The tick Done keeps the bars with the photo, so that you can take it up again later. While the photo is matched you cannot orbit the camera — then it would no longer be right.
Note. A photo taken straight from the front cannot be matched: that needs two vanishing points, so edges running away from you at an angle. Use Straighten the photograph instead.
Chapter 11
Making: printing and building by hand
From the screen to the workbench: check and improve your model for your 3D printer, or make construction drawings, print sheets, cut-and-fold sheets and laser cut files to build by hand.
Print check and making printable
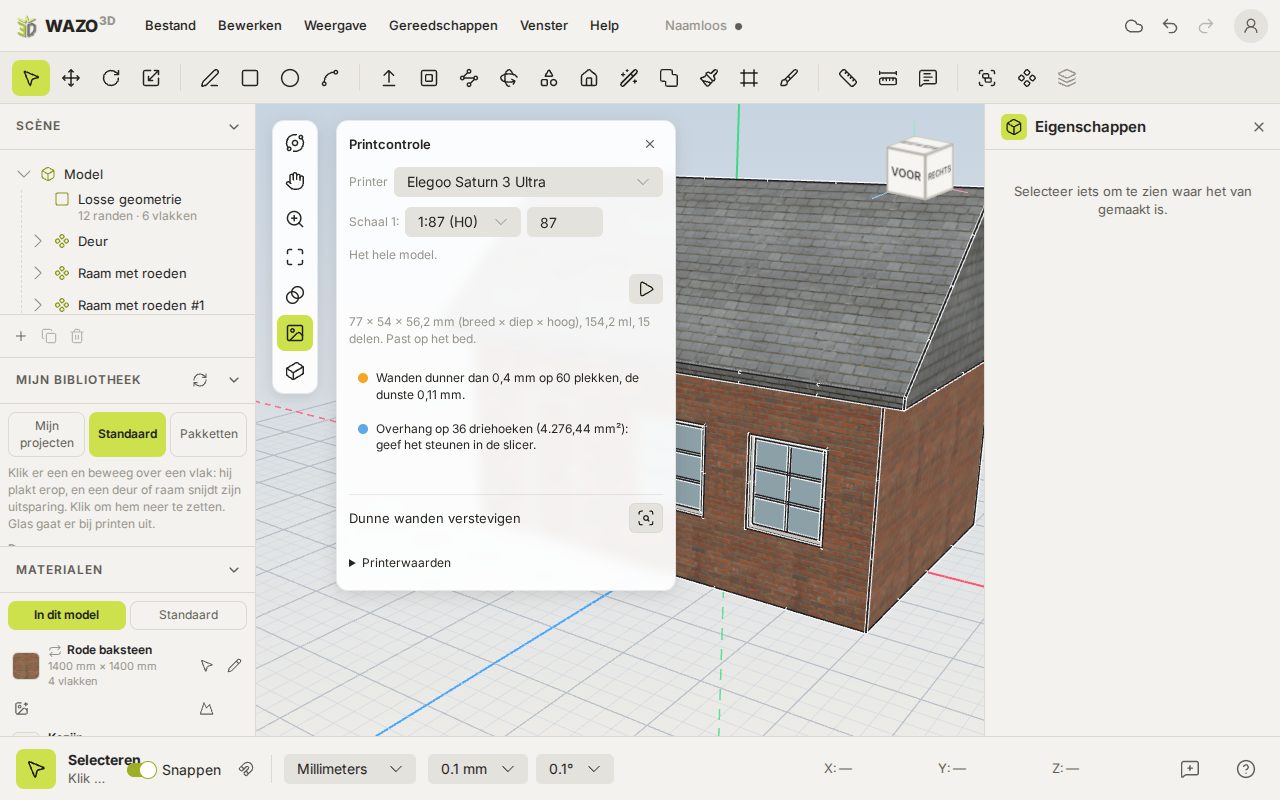
The print check: walls that are too thin, orange on the model
File › Print check… looks at whether your model prints well, at the scale you print at and for your printer. Choose the printer (filament or resin; Bambu Lab, Creality, Elegoo, Anycubic, Prusa, Formlabs) and the scale (1:87 for H0, 1:160 for N, or type a number yourself), and click Check. When something is selected it checks only those groups; otherwise the whole model.
Open edges and inside out: the model is not closed or looks inward. Repair it through Tools › Repair.
Walls too thin: thinner than your printer can manage, measured at the print scale. A wall of 20 cm is not even 2.3 mm at H0, a plate of 2 cm only 0.23 mm.
Loose scraps and a model that is too small as a whole.
Overhang: faces looking down at too steep an angle. With filament you need supports there; with resin it is a note, since resin prints with supports anyway.
Too big for the bed, and whether it does fit when laid on another side.
Making it printable: when the list has open edges, inside-out parts or scraps, the button with the wrench appears. One click closes the model, turns the faces outward and takes away scraps too small for your printer — in every group, or only in what you have selected — and then checks again. Windows and doors go on cutting and glass stays out of it. One Ctrl+Z puts everything back. Walls too thin and overhang belong to the shape itself; only you can change those.
Carving the relief in: when a picture has a height map, the print really carves that relief into the surface — the joints between bricks, the grain of planks — instead of only showing it on screen. It works like a displacement map: middle grey stays on the surface, white comes the Relief depth out and black goes as far in. So bricks stand out and joints lie deeper, and your model grows or shrinks that much in those places. On a large model carving takes a while: a bar shows how far it is. You see the relief in the view too: the light falls from the upper left and turns with your view, and a height map shades the joints — the deeper you set it, the stronger. The depth is on the model at its real size; under the field it says what that comes to on the print at the print panel's scale (at 1:87, 10 mm on the model is 0.11 mm printed). The standard textures have a real height map and a starting depth; for a picture of your own you choose one in the properties (Choose a height map…), or WAZO3D works it out of the normal map when printing. The surface is divided as finely as your printer shows at this scale. The Carve the relief in switch in this box turns it on or off, for the check and for the STL. Corners and edges next to faces without relief stay where they are, so the model stays closed.
Stiffening thin walls: at the bottom of the box, Find thin walls that may bulge (the magnifying glass) looks for large, thin walls facing the inside of your model, such as the walls of a house a millimetre thick. They are marked orange. Then choose Ribs across the shorter span, A grid of ribs or Make the wall twice as thick: the stiffening appears in blue on the inside, so you can see whether you want it. The rib spacing is measured on the print and you can change it. Windows and doors stay clear. The tick puts the stiffening in as a group of its own, Stiffening; if you do not like it after all, throw that group away. Hollowing never happens by itself.
Click a line and the spots light up on the model (red is a fault, orange a warning, blue a note). Under Printer values you adjust the build volume, the thinnest wall, the smallest detail and the overhang allowed; it remembers that for that printer in this browser. The plus adds a printer of your own. The values in the list are the maker's figures or a rule of thumb; check them for your own printer.
Construction drawing
Under File › Make is what you need to build your model by hand.
File › Make › Construction drawing (PDF)… draws your model from the front, from the left and from above (first-angle projection: the left side view stands on the right, the top view below), to scale, on light squared paper, with the sizes and a title block with your project's name, the scale and a scale bar (so you can also measure on a sheet printed larger or smaller).
Every size you need. Along each view are two rows: a chain of sizes from line to line (where the door begins, how wide the window is, how high the sill), and under it the overall size. On the first sheet the chain measures your model itself and its openings.
Every component apart. After the first sheet, every component in your model (a door, a window, a part of your own) gets a sheet of its own, as large as fits on the paper, with its own scale, all its sizes and how many times it is in the model.
Paper: A4, A3, A2, A1, Letter or Tabloid, landscape.
Scale: choose one (the model railway scales too, such as 1:87 for H0 and 1:160 for N), or The largest that fits. If it does not fit on the sheet at your scale, WAZO3D says so first.
Sizes: as they really are, or as they come out at the scale — handy when you build in styrene or card at scale.
Hidden lines dashed: what lies behind something else is added dashed.
Light squared paper and Every component on a sheet of its own: are on; switch them off for a bare sheet.
Cutouts such as windows and doors are on it as holes with their frames. Glass does not count: you look through it.
Print sheet
File › Make › Print sheet (PDF)… lays every painted face flat on the sheet, at the scale you choose (1:87 to begin with), with its colour and its pictures exactly as they lie on the model. Windows and doors are cut out; their frames and the glass are not on it. Every piece has a thin grey cutting line and a number.
Print at 100%, not "fit to page", or the scale is wrong. It says so at the bottom of every sheet.
Only what you have painted goes on it. If nothing is painted yet, WAZO3D says so.
If a piece is bigger than the sheet, it runs off and WAZO3D says how many pieces that are: choose A3 or a smaller scale.
Cut-and-fold sheet
File › Make › Cut-and-fold sheet (PDF)… unfolds your model flat, to scale, to print on card, cut out, fold and glue. A box becomes one cross; faces that would fall over each other become a piece of their own.
Cut along the solid lines, the holes of windows and doors too.
Mountain fold (dash-dot): the corner points toward you when the printed side is up. Valley fold (dashed): the corner points away from you.
Glue tabs are grey. A cut edge has the same number on both sides: those go onto each other.
With the colours and pictures puts your model's paint on it; off gives a bare sheet to paint yourself.
Print at 100%. Frames and glass are not on it: those are separate parts.
Two faces only fold together when they share exactly the same edge. When one face's edge is divided in two at the other (a point halfway), it becomes a cut with a glue tab.
Laser cut file
File › Make › Laser cut file (SVG)… makes every flat face a panel of sheet material at scale, to cut from card or thin wood with a laser cutter. Choose the scale, the Material thickness, the Sheet size of your laser cutter and the Corners: Finger joints (square corners interlock; the Finger width is three times the material thickness by itself) or Plain, glued. Where two panels meet, the smaller gives way by the material thickness, so the model has its own sizes once glued. Windows and doors are cut out; glass and round shapes are left out. Red lines are cut, the blue numbers engraved: they come on the inside. In the middle of every panel is its own number; along every edge, small, is the number of the panel that goes against it. If an edge says 5, panel 5 belongs there. The Kerf is what the laser burns away (0.1 mm by default): every cutting line moves half of it off the material, so panels, fingers and openings are exactly to size once cut. Don't know your laser's kerf? Cut a square of 20 mm and measure how much smaller it is. If it does not fit on one sheet, you get a zip with one file per sheet. LightBurn, xTool, Glowforge and Inkscape read it.
Chapter 12
Saving, sharing and exchanging
Keeping your model in your account, sharing it with others and with other apps, putting it in the showcase, and importing and exporting.
Saving, projects and your library
Your model is kept in your browser by itself: after reloading it is there again. But only in that browser on that computer.
SaveCtrl+S keeps it as a project in your account on the site.
Save as new project…Ctrl+Shift+S makes a new project of it.
WAZO3D as an app. With Help › Install as an app you put WAZO3D on your computer as a program of its own, with its own window and icon. The entry is active as soon as your browser offers installing (Chrome and Edge do). The app starts quickly and opens without internet too; saving to your account does of course need a connection. Updates come by themselves.
Open…Ctrl+O shows your projects with a picture.
Versions… brings back an earlier save (the last 20 are kept).
A model from another site (TRAX3D, for example, with Go on building in WAZO3D) opens here as a copy not yet saved, as soon as you are logged in or have signed up; when you save, the name it had there is suggested. The link works once, within a day.
Your library is your own projects: in the My library panel you click a project and it hangs on the cursor as a component. Save that project again later and the component offers Update to the latest save.
You also manage your projects on the website under My projects. The logo at the top left takes you to the site.
Sharing with other apps
File › Share… makes a link with which other apps can fetch your model. WAZO3D does not ask where it goes, nor what it is: the app that fetches it says that, and adds what it wants to know itself, such as a category. Switch on Share with other apps and you get the link; the button beside it copies it. Whoever has that link always gets your latest save: at every Ctrl+S WAZO3D gets the model ready again, so you need change nothing in the other app when you improve it.
There it goes under your project's name, the same name you see in WAZO3D.
What goes along: the model as a .glb with its colours and pictures, your project's picture, and how big it is (wide × deep × high, in metres). Nothing else of your account.
It goes along at real size and where you drew it. So draw it on the ground (y = 0): the other app then knows where its foot is and can put it down neatly.
Switch sharing off and the link lapses at once and the model can no longer be fetched anywhere. Switch it on again after that and you get a new link: the old one stays dead.
When there is nothing in the model yet, there is nothing to fetch either; draw something and save it.
One switch is yours: show my name with it. It is off until you switch it on. Whoever has the link can always look at your model, also where it stands in somebody else's work. Whether others may use it in their own work, and what it is (a building, a signal, a water crane), is for the app that fetches it to ask.
Under the link is what is good to know before it goes: that the file is heavy (and that it is the pictures), that there is still a loose face or line somewhere — which makes the other app think your model is much bigger than it is — or that it has many triangles. Nothing is refused; it is a tip, and this is the moment you can still do something about it.
Putting it in the showcase
In the same dialog, File › Share…, under In the showcase, is the other place your model can go: the showcase on the WAZO3D site. Everybody sees it there, in 3D to turn round, with your words beside it. Switch on Show it in the showcase and it is there; the link See its page in the showcase takes you there. As with sharing, every save brings it up to date.
A few words about it: what it is, how you made it. They go along as soon as you leave the field.
Licence — you choose whether others may download it:
View only: looking and turning it round, not downloading. You keep every right.
CC BY 4.0: commercial use allowed, credit needed. Anybody may download, change and use it, also to earn money with it, as long as they credit you.
CC BY-NC 4.0: not commercial, credit needed. Downloading, changing and using are allowed, but not to earn money with it.
Under a CC licence the page has two download buttons: .glb (for any 3D program) and .wazo (to go on building in WAZO3D).
Show my name with it is off until you switch it on. While it is off, the page says "a WAZO3D maker" and your model cannot be found through your name either.
Switch the showcase off and the page disappears at once.
Whoever sees something that does not belong there (somebody else's design, something illegal or hateful) can report it on the page. If the administrator then takes it off, the dialog says so; your choices are kept and only you still see the page.
For testers, a model in the showcase counts as sharing towards the Early Access credits, just like sharing with other apps.
Importing and exporting
Importing
File › Import…, or drag a file onto the view. glTF / GLB, STL, OBJ and FBX. For STL, OBJ and FBX you are asked which unit the file is in and whether Z points up. What comes in becomes one group with the file's name. The parts of the file come into it as groups with their own names, nested as the file nests them; open a group with a double click to work inside it.
Files that stand beside the model. A .gltf often keeps its data (.bin) and pictures as separate files beside it, an OBJ its materials in an .mtl, an FBX sometimes its pictures. Then choose those together with the model (select several files at once, or drag them onto the view together); the folder the model names them in does not matter. If something is missing, the editor says which files: without the .bin nothing comes in. If a picture is missing, the editor asks for it while importing: choose it, even when it is called something else than the model says (a model naming tex_castle.png also takes castle_tex.jpg). If you chose exactly one picture along that the model does not know by name, and exactly one is missing, it takes that one without asking. Import without it and the model comes in in its colour.
The materials come along: a colour as a paint, and a picture (with its normal map, if there is one) exactly as it lay on the model in the other program. Triangles in one plane become one face again, but only where the picture runs on — where the other program laid another piece of the picture on a triangle, that stays a face of its own. A face you later divide in two keeps its piece of the picture on both halves. An OBJ does not bring its materials (they are in a separate .mtl file); an FBX or glTF does.
Exporting
Format
For
Free
WAZO3D model, everything in it (.wazo)
Everything in it, also loose lines, groups and circles. The file to send when something about the model has to be looked into.
yes
glTF (.gltf)
The web, three.js, most 3D programs. One text file, with colours and pictures in it.
yes
glTF binary (.glb)
The same, but more compact.
Power
STL, for 3D printing (.stl)
3D printing. If the model is not closed, WAZO3D first says how many edges are open. Then you choose the scale you print at (1:87 for H0) and see how big it comes out; the file stands upright (Z up), as a slicer such as Chitubox expects. The scale is in the file's name: station-1-87-h0.stl.
as a make
OBJ (.obj)
Comes as one zip file with the materials and pictures beside it.
Power
FBX, for Blender, Unity and 3ds Max (.fbx)
Blender, Unity, 3ds Max. The pictures are inside the file itself.
Power
WAZO Fun and WAZO Power. With WAZO Fun, the free plan, you keep 25 projects, each with its previous version, and you make something 5 times in all: a 3D print file, cut-and-fold sheet, print sheet or construction drawing. Each of those belongs to one project and may be made again up to 5 times, after a change for example. For that the model must be kept as a project. With Power there are no limits. During Early Access everything is free.
Chapter 13
Help
Stuck, or seeing something that is not right? Ask on the forum or send a question to support.
Asking for help: the forum
The WAZO3D site has a forum with three parts: Questions (how do I…), Show what you made and Ideas (what WAZO3D ought to be able to do). Everybody can read along; writing takes an account.
You write in Markdown: **bold**, *italic*, [a link](https://…), lists. Pictures from other sites become a link.
Under Show what you made you can put one of your own models from the showcase under it, so others look at it in 3D at once.
Whoever asked a question can mark the reply that answered it with This answered it. Still unanswered shows the questions nobody has solved yet.
A thumbs up says what is good; not on your own words.
New replies to your own topics are in the weekly digest, if you get it.
Something that does not belong there, you report under the reply; an administrator looks at it.
Support
Help › Support… (or the button at the bottom right of the status bar) sends a question or report with a picture of the view and what the editor was doing. Under Which model is it about? you choose one of your own models (the model that is open is already there); support can then open it to have a look, nobody else. You follow it on the website under Support, where you can also ask a question without the editor. The more exactly you describe what you did and what you expected, the sooner it is solved. No account is needed: if you are not logged in, you fill in your name and e-mail address and we mail you a link where you follow your question, read our answer and write back. Make an account later with the same address and your question is there too.
Appendix
Keyboard shortcuts
All keyboard shortcuts on a keyboard. Print this page and lay it beside your keyboard; the table under it says exactly what each key does.
On the keyboard
EscStop · let go
F1
F2
F3
F4
F5
F6
F7
F8
F9
F10
F11
F12
`
1
2
3
4
5
6
7
8
9
0
-
=
BackspaceDelete
Tab
QRotate
W
E
RRectangle
TMeasure
Y
U
I
O
PPush/Pull
[
]
\
Caps
AArc
SScale
D
FOffset
GGroup
HHand (held)
J
K
LLine
;
'
EnterConfirm size
ShiftHold the snap
Z⇧ Zoom extents
XSee-through
CCircle
V
BPaint
N
MMove
,
.
/
ShiftHold the snap
CtrlTap: copy
AltSurface only
SpaceSelect · hand
Alt
Ctrl
←Blue axis
↑Green axis
↓Normal
→Red axis
With Ctrl: Z undo, Y redo, XCV cut, copy, paste, D duplicate, S save, O open.
All keyboard shortcuts
Key
What
Space
Tap: Select. Hold and drag: pan.
H
Hold and drag: pan
LRCA
Line, Rectangle, Circle, Arc
PF
Push/Pull, Offset
MQS
Move, Rotate, Scale
B
Paint (the bucket)
T
Measure, guides
G
Make a group of the selection
Ctrl (tap)
While moving: copy. While measuring: guides on/off.
Ctrl+Z / Ctrl+Y
Undo / Redo (also Ctrl+Shift+Z)
Ctrl+XCV
Cut, Copy, Paste
Ctrl+D
Duplicate
Ctrl+S / Ctrl+Shift+S / Ctrl+O
Save / Save as new project / Open
Shift+Z
Zoom extents
X
See-through model on/off
Shift (hold)
While drawing: hold on to what it snaps to
Alt (hold)
While drawing: the surface only
→↑←↓
While drawing: fix the red, green or blue axis or the normal
Delete / Backspace
Delete the selection
Esc
Stop, then select nothing, then close the group
In the editor they are also under Help › Keyboard shortcuts.